This is my third post about logo designing and the logo I have selected to draw today is of Douglas County Bank (a bank that is offering banking and trust services to Northeastern Kansas USA). In the following image you can see a logo of Douglas County Bank that I have just made using CorelDraw X6. Though the logo in this image may seem very simple and apparently made up of a few equal sized triangular shapes placed together, but when it comes to draw it by hand or by the use of CorelDraw, it might not be proved as much simple as it looks.
When I made my first attempt to draw this logo using triangles, I couldn't succeed and it took almost three hours to discover a proper method through which one can draw it without wasting much time or without getting bored. Here in this post I have decided to share the same method I have just discovered about the designing of Douglas County Bank's logo by the use of Polygon Tool, Rectangle Tool,Outline Pen Tool, Text Tool, Mirror Vertically, Mirror Horizontally and a very useful shaping option named Trim given in CorelDraw X6.
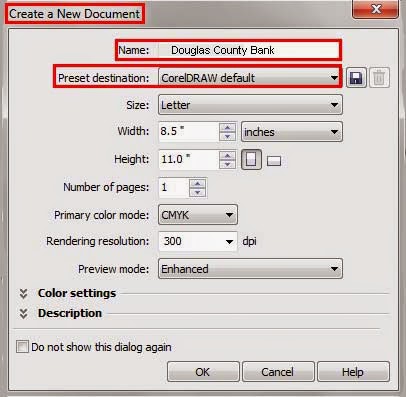 |
| Name, Preset destination, Size, Color mode and Resolution for the document |
Having created a new document, first of all, select
Polygon Tool either by clicking on it in the Tool Box or by hitting
Y on the keyboard.
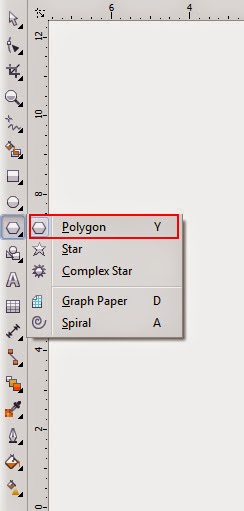 |
| Polygon Tool in the menu |
As soon as you will select that tool, pointer of your mouse will assume the shape of a plus (+) sign with a tiny five-cornered shape at the bottom-right of it, and the properties of the selected tool including
Points or sidesand
Outline width will be appeared on the Property Bar.Set the value equal to
6 in the box referred as
Points or sides and select
0.5 out of the values given in the drop-down menu named
Outline width for the polygon. Then, put the pointer of your mouse anywhere on the document and draw a six cornered shape by dragging your mouse in any direction and keeping it’s left button pressed. Then with the help of
Pick Tool select that shape and set its width equal to
6.1 and its height equal to
6.7 in the Property Bar by typing the values in the relevant boxes and hitting the
Enter Key. As soon as you will hit the
Enter Key on the keyboard, the selected six sided shape will assume the same width and height.
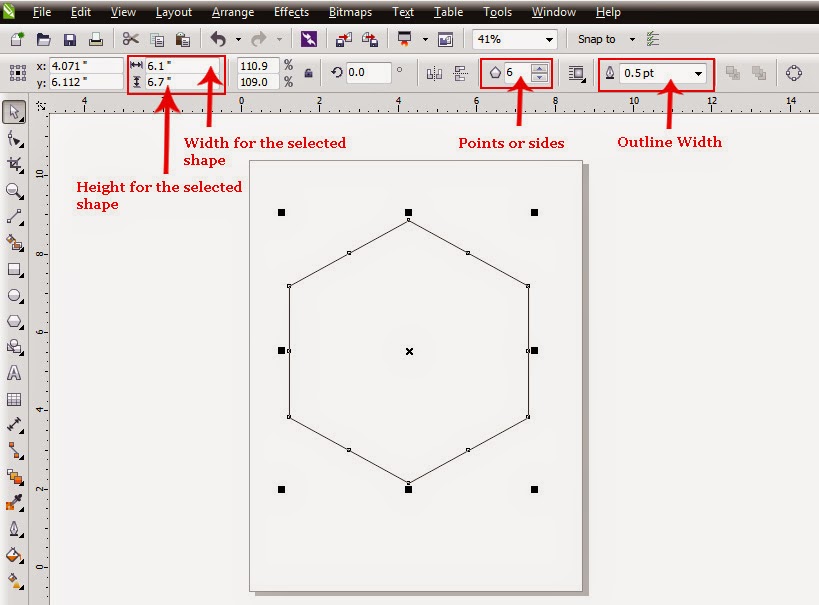 |
| Width, Height, Sides and Outline width for the polygon |
After that, make a duplicate of that recently made shape either by getting inside the
Edit Menu and selecting the option
Duplicate or by hitting
CTRL + D on the keyboard.
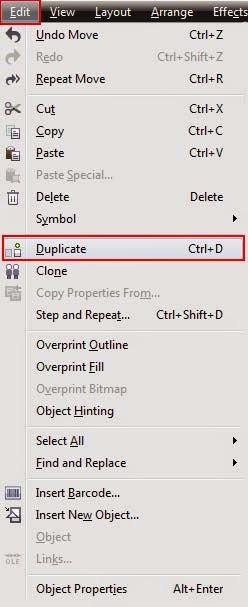 |
| Option named Duplicate in the menu named Edit |
As soon as you will do so, another six-cornered shape with equal width and height will be appeared on the document. Then, with the help of
Pick Tool, select that duplicate shape and set it’s width equal to
4.1 and its height equal to
4.7 in the Property Bar by typing the values in the relevant boxes and hitting the
Enter Key. As soon as you will do so, duplicate shape will assume the same width and height.
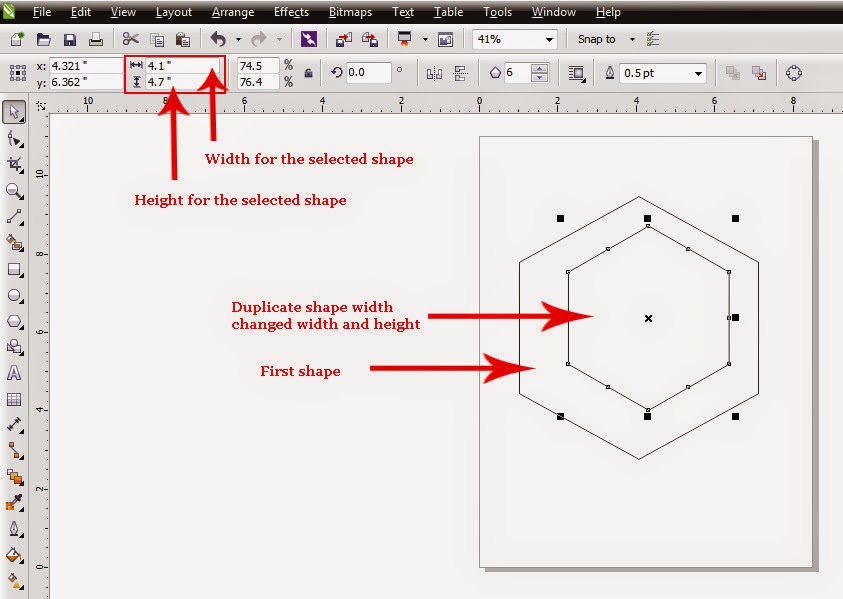 |
| Two six sided shapes with different size |
Then select both the shapes on the document by hitting
CTRL + A on the keyboard and align their centers horizontally, by hitting
E on the keyboard and vertically, by hitting
C on the keyboard. As soon as you will hit these two keys, both the shapes on the document will be set on the same spot.
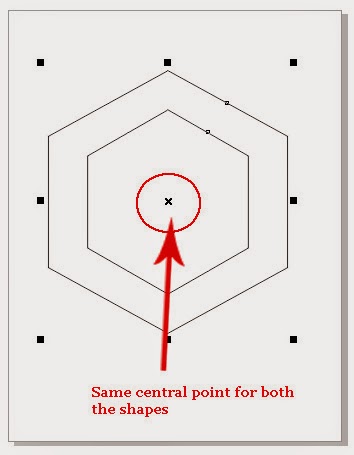 |
| Two shapes neatly placed on the same spot |
Then once again select both the shapes by hitting
CTRL +A or by getting inside the
Edit Menu and selecting the option named
Objects that is supposed to be found in the
Edit Menu’s option
Select All’s side menu. As soon as you will select both the shapes, shaping options (including
Weld, Trim, Intersect, Simplify, Front minus back, Back minus front and
Create boundary) will be appeared on the Property Bar. Out of those shaping options, the option that is supposed to be selected here is
none other than
Trim. So select the option
Trim so that the part of the first shape that is hidden behind the duplicate shape could be trimmed off. As soon as you will select that option, the hidden part of the first shape will be trimmed off nicely.
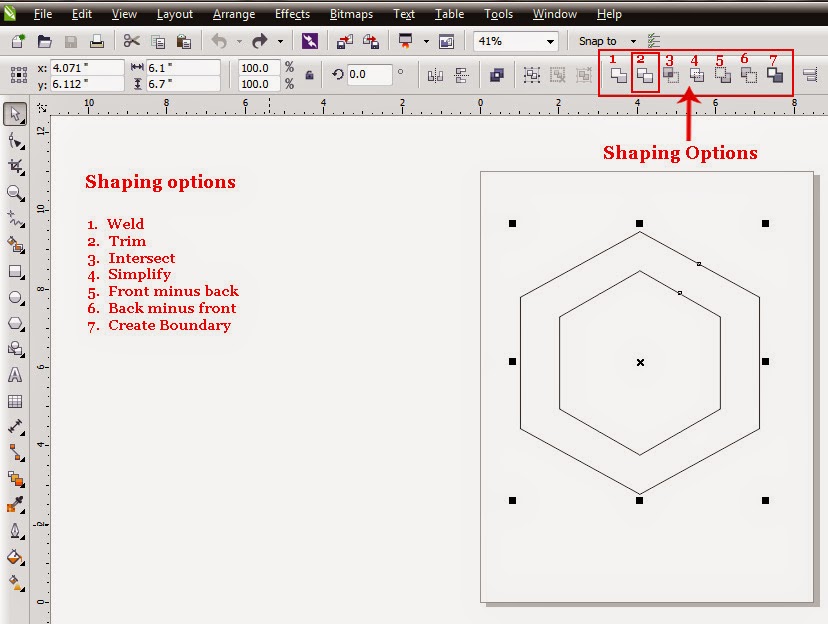 |
| Shaping options for the two selected shapes |
Then, select the duplicate shape with the help of
Pick Tooland delete it either by getting inside the
Edit Menu and selecting the option
Delete or by hitting the
Delete Key on the keyboard. As soon as you will do so, duplicate shape will be deleted and there will be left nothing but a ring shaped part of the first shape with empty central area.
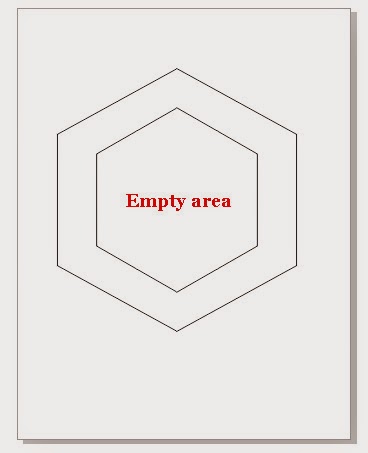 |
| Ring shaped part of the first shape with empty central area |
After that select that ring shaped remaining part of the first shape with the help of
Pick Tool and fill dark maroon color inside it. As in the default CMYK Color Palette, that shade is not supposed to be found so in order to fill that color inside the selected shape, get inside the
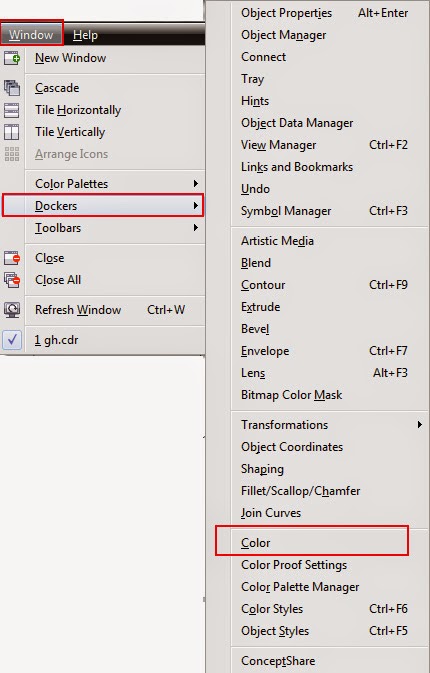
Window Menu and select the option
Dockers. As soon as you will select that option, it’s large side menu will be appeared containing more than twenty five options. Out of those options select none other than
Color.
 |
| Window Menu containing various options |
As soon as you will select that option, a window named
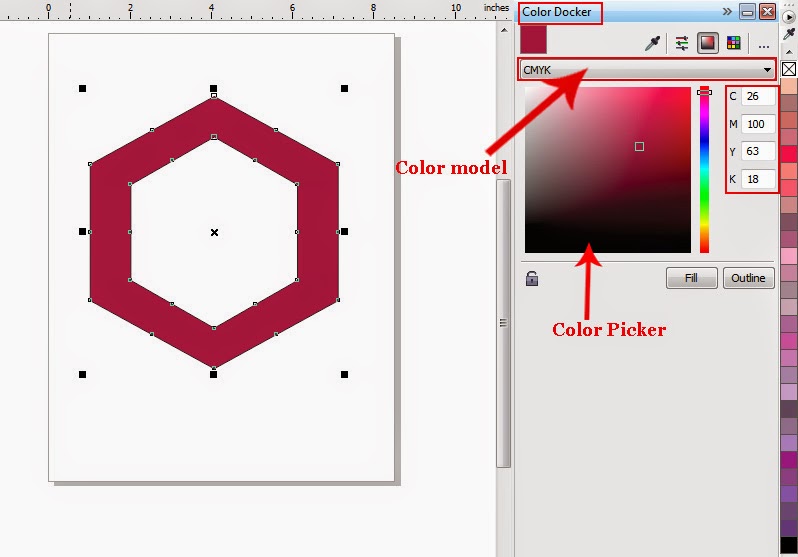
Color Docker will be appeared on the right side of CorelDraw window beside the Color Palette. In that window there will be seen a drop-down menu called
Color model and a
Color Picker like the one we have seen and used in Photoshop
. Out of the options given in that drop-down menu called
Color model, select
CMYK. As soon as you will select that option, four boxes representing
Cyan (C),
Magenta (M),
Yellow (Y) and Black (K) will be appeared in the same window. Type
26 in the box representing
Cyan (C),
100 in the box representing
Magenta (M),
63 in the box representing
Yellow (Y)and
18 in the box representing
Black (K). Having set the components of all four colors, hit the button named
Fill that can be seen beneath the
Color Picker. A soon as you will hit that button required shade will be filled inside the selected shape.
 |
| Color Docker window |
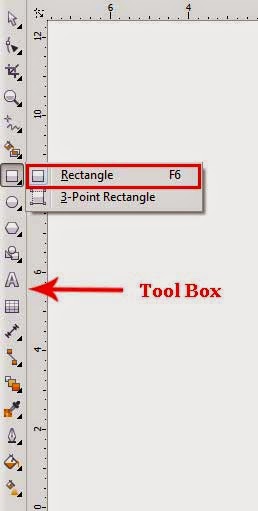
After that, select
Rectangle Tool either by clicking on it in the Tool Box or by hitting
F6 on the keyboard.
 |
| Rectangle Tool in the menu |
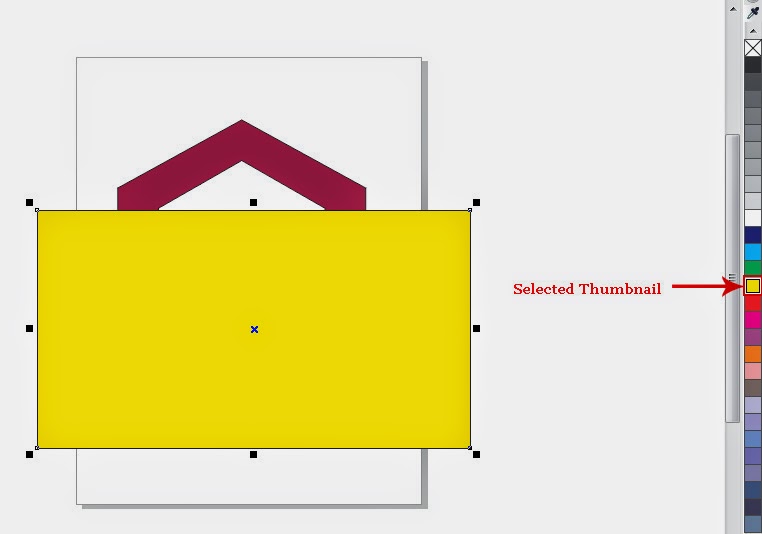
As soon as, you will select that too,l pointer of your mouse will assume the shape of a plus ( + ) sign with a small rectangular shape at the bottom right of it. Then, put that plus sign shaped pointer of your mouse anywhere on the document and draw a large rectangular shape there by dragging your mouse in any direction and keeping it’s left button pressed. Then fill any color in that rectangular shape to make it clearly visible by selecting any thumbnail representing any bright color in the Color Palette with left mouse click. After that, with the help of
Pick Tool put that newly made rectangle on the lower part of the maroon shape so that it could hide the whole shape save from the upper triangular part of the shape according to the picture below.
 |
| Right way to place rectangle on the six cornered shape |
After that, select both the shapes on the document by hitting
CTRL + A. As soon as you will do so, shaping options will again be appeared on the Property Bar. Out of those options select
Trim again to have the hidden part of the maroon shape nicely trimmed off. As soon as you will select that option, hidden part of the maroon shape will be trimmed off or deleted.
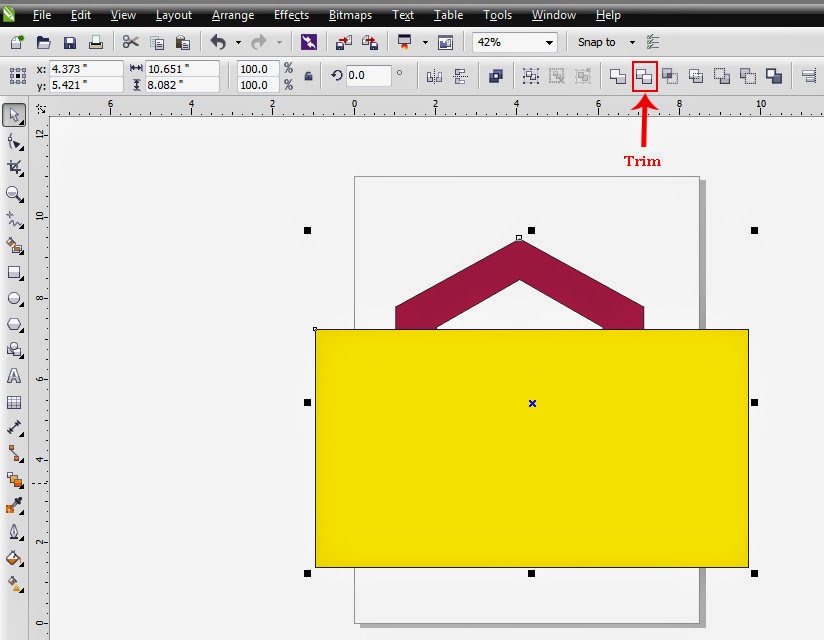 |
| Trimming of the lower part of the shape. |
Then, with the help of
Pick Tool put that bright colored rectangle on the right side of the maroon shape so that it could hide the unnecessary part of the triangular shape. Then select both the shapes on the document again by hitting
CTRL + A to have the shaping options again on the Property Bar according to the picture below.
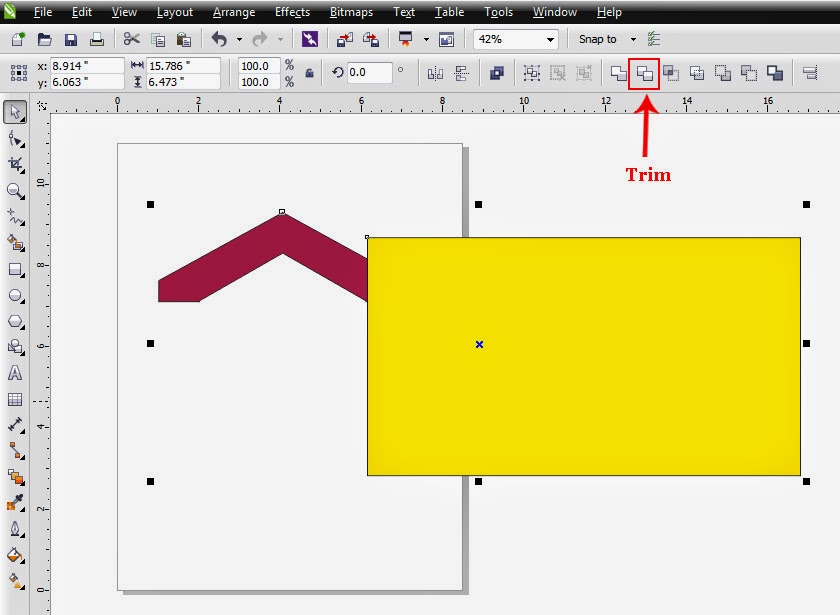 |
| Unnecessary right part of the shape is about to be trimmed |
Out of those shaping options, select the option
Trim again to trim the unnecessary right part of the shape. As soon as you will select the option
Trim, unnecessary part of the shape hidden behind the rectangle will be deleted or vanished . Then with the help of
Pick Tool put that bright colored rectangle on the unnecessary left part of the shape so that it could hide it, and again select both the shapes on the document by hitting
CTRL +A to have the shaping options including
Trim once more on the Property Bar according to the picture below.
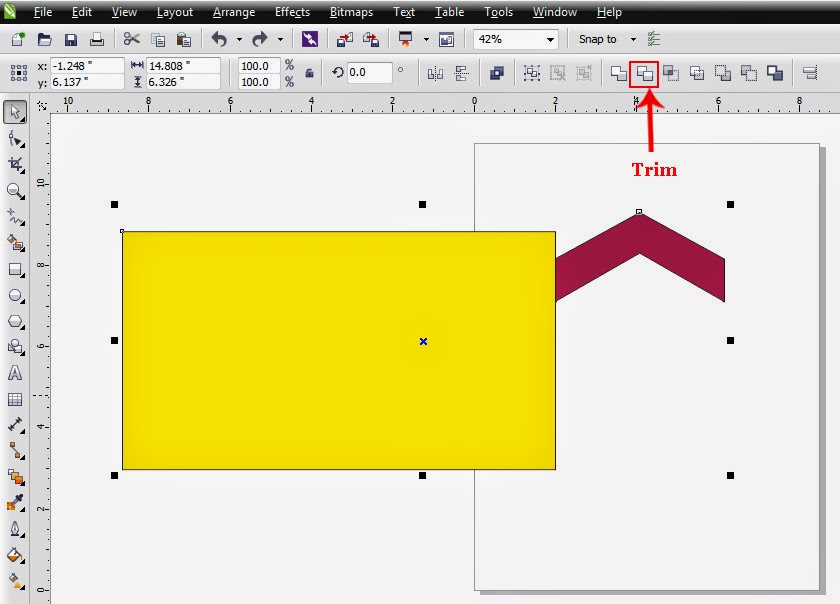 |
| Unnecessary left part of the shape is about to be trimmed |
Then, select the option
Trim once more to have the unnecessary left part of the shape nicely trimmed off. Having done so, select that large bright colored rectangle with the help of
Pick Tool and delete it either by getting inside the
Edit Menu and selecting the option
Delete or by hitting the key named
Delete on the keyboard. Having deleted the rectangle you will have nothing on the document but an L shaped part of the maroon shape.
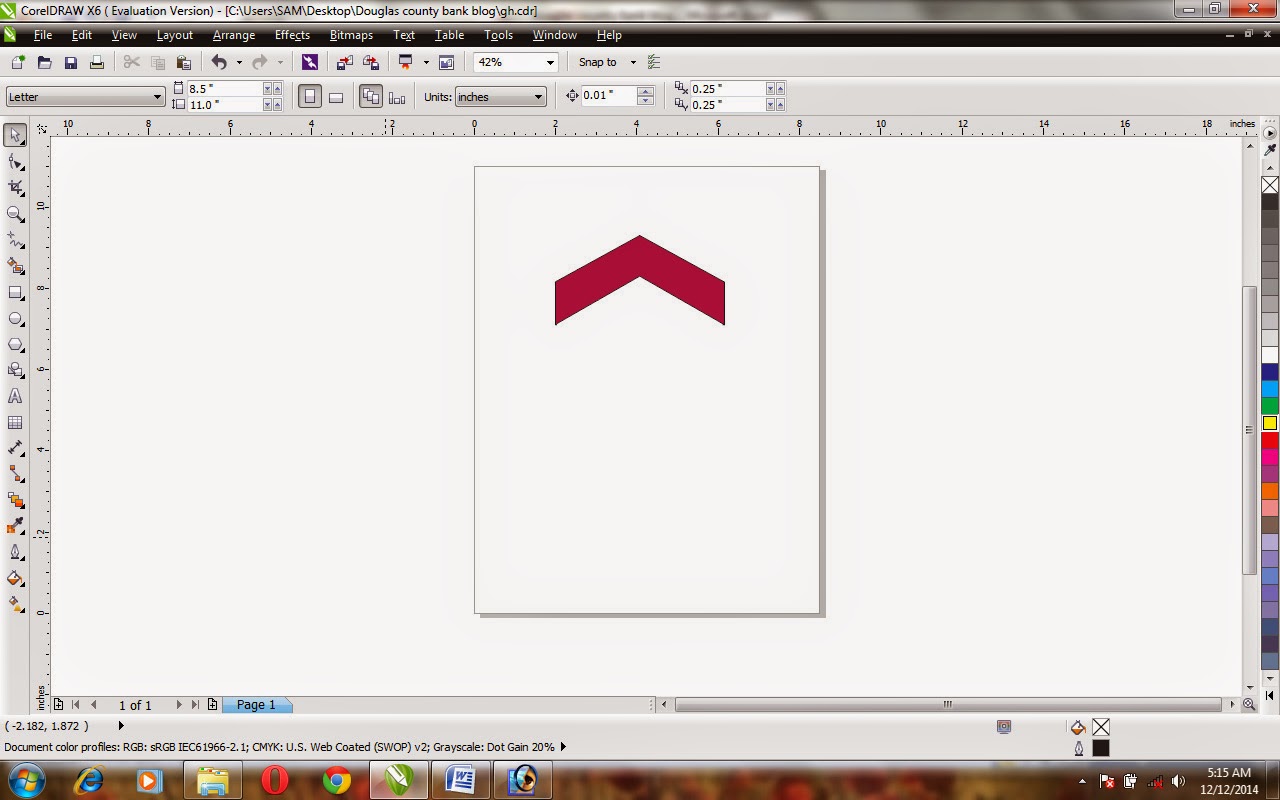 |
| Remaining part of the sex cornered shape on the document |
Then, select that shape with the help of
Pick Tool and make a duplicate of it either by hitting
CTRL + D on the keyboard or by getting inside the
Edit Menu and selecting the option
Duplicate given in the menu. As soon as you will select the option
Duplicate or hit
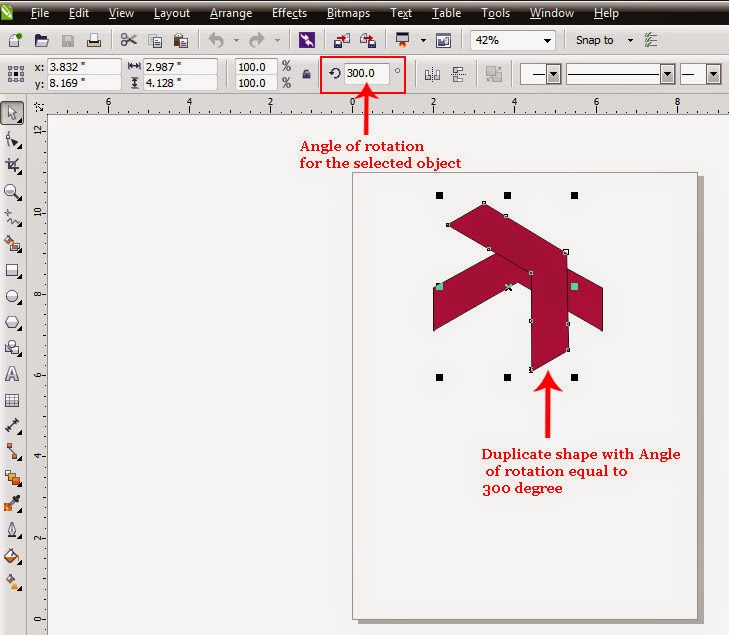
CTRL + D, a duplicate maroon colored shape will be appeared on the document. Select that maroon colored duplicate shape with the help of
Pick Tool and set the
Angle of rotation for it equal to
300o by typing the value in the relevant box given in the Property Bar and hitting the
Enter Key. As soon as you will hit the
Enter Key, the selected shape will be rotated on the same angle.
 |
| Duplicate shape rotated on the angle of 300 degree |
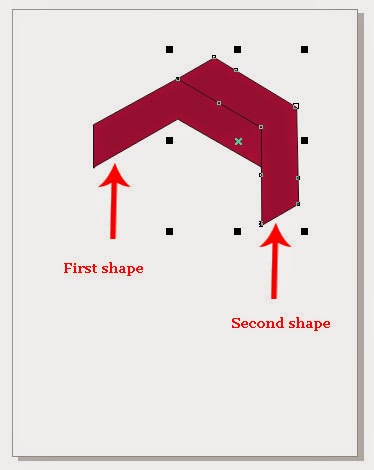
After that, with the help of
Pick Tool put that duplicate shape with
300o Angle of rotation beside the first shape according to the picture below.
 |
| Right place for both the shapes |
Then, select that duplicate shape with the help of
Pick Tool and make a duplicate of it too, either by hitting
CTRL + D on the keyboard or by getting inside the
Edit Menu and selecting the option
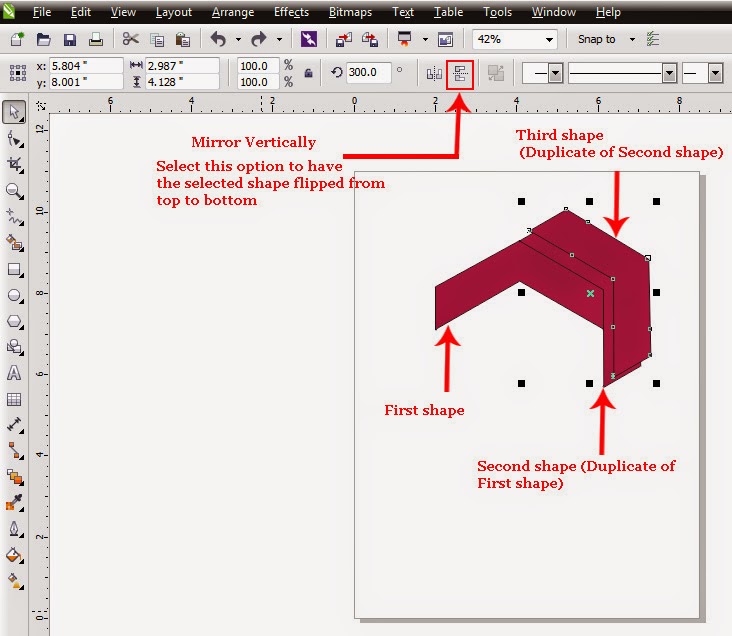
Duplicate. As soon as you will do so, a duplicate of the second shape will be appeared on the document. Select that duplicate shape with the help of
Pick Tool to have it’s properties activated in the Property Bar. Then, in order to have that recently emerged third shape on the document flipped from top to bottom, select
Mirror Vertically by clicking on it in the Property Bar.
 |
| Third shape ready to be mirrored vertically |
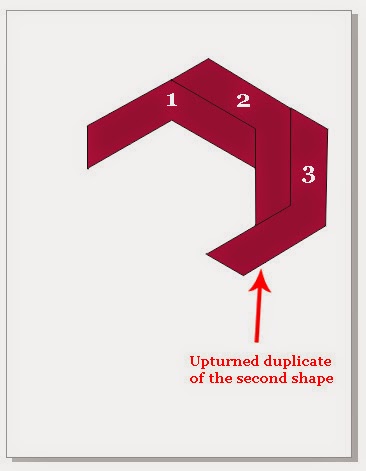
As soon as you will do so, the third shape will turn upside down. Then, with the help of
Pick Toolput that upturned duplicate of the second shape beside the two shapes according to the picture below.
 |
| Three shapes on the right places |
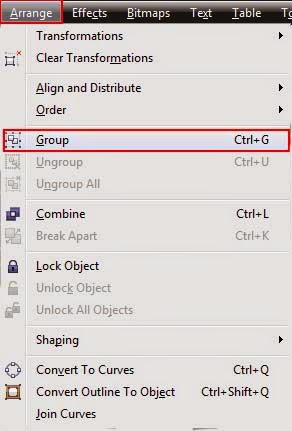
Then, select all the shapes on the document by hitting
CTRL + A on the keyboard and group them together either by getting inside the
Edit Menu and selecting the option
Group or by hitting
CTRL + G on the keyboard.
 |
| Option referred as Group in the Arrange Menu |
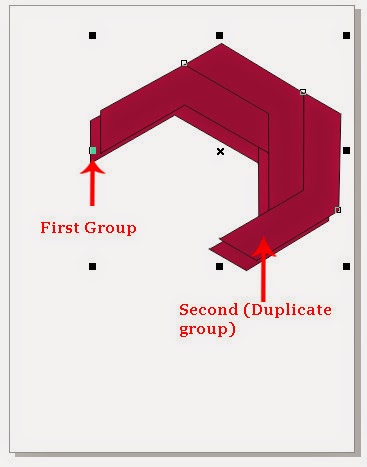
After making a group of all the shapes, select that group with the help of
Pick Tool and make a duplicate of it either by hitting
CTRL + D on the keyboard or by selecting the option called
Duplicategiven in the
Edit Menu. As soon as you will do so, a duplicate group of three shapes will be appeared on the document.
 |
| Two groups on the document |
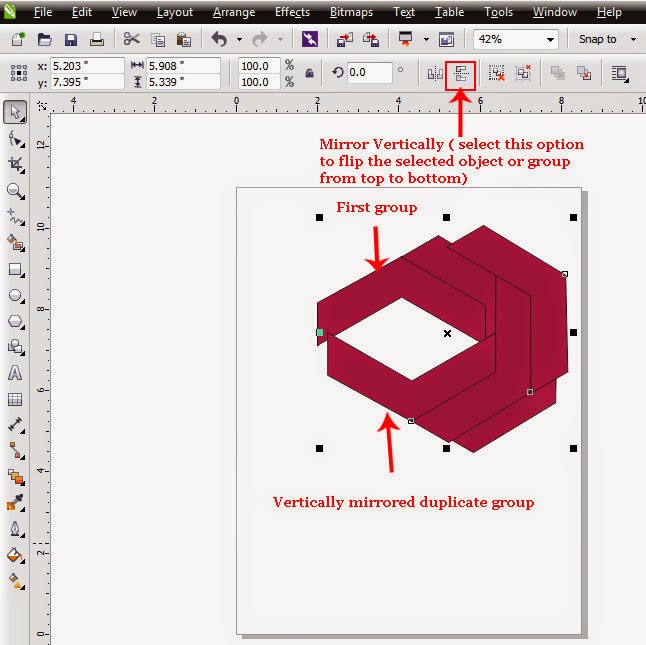
Then, select that duplicate group with the help of
Pick Tool and flip it from top to bottom by selecting
Mirror Vertically on the Property Bar.
 |
| Duplicate group after being mirrored vertically |
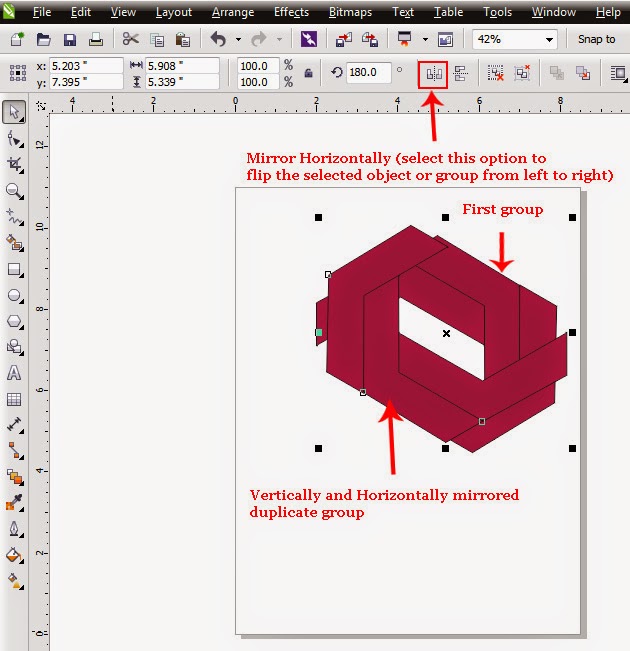
Then, flip the same group from left to right by selecting
Mirror Horizontally on the Property Bar.
 |
| Duplicate group after being mirrored vertically and horizontally |
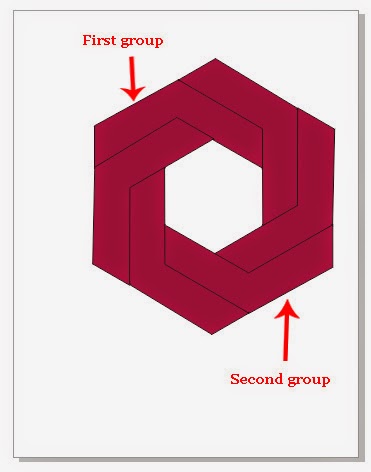
After that, with the help of
Pick Tool place that horizontally and vertically mirrored group right beneath the first group according to the picture below.
 |
| Two groups on the right place |
After that select both the groups on the document by hitting
CTRL + A and group them together by hitting
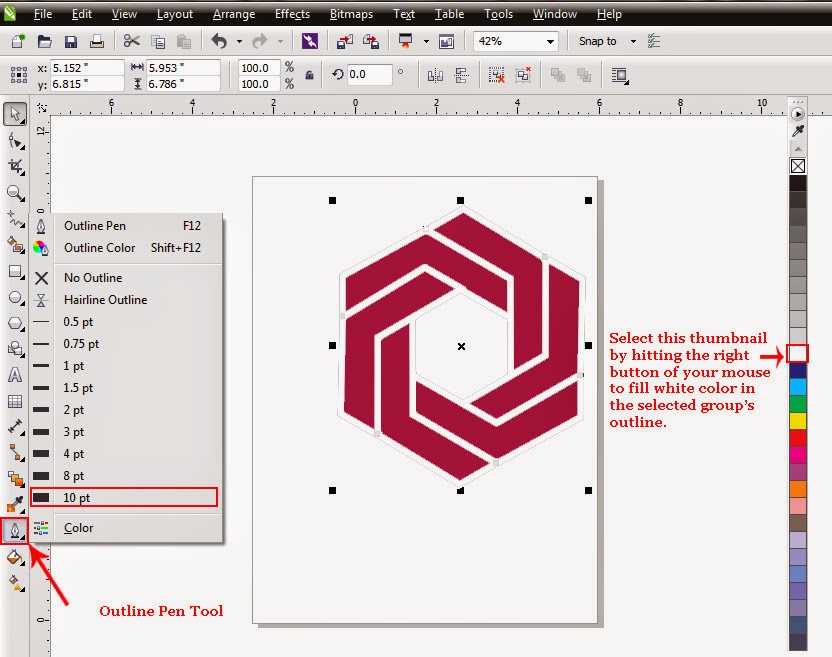
CTRL + G. After that, click the small arrow that can be seen at the bottom right of the tool named
Outline Pen in the Tool Box to open a menu containing different outline styles. Out of those styles, select
10 pt for the selected group and then in order to fill white color in the outlines of the shapes in the selected group , select the thumbnail representing white color in the Color Palette with right mouse click.
 |
| Outline width and Color for all the shapes in the selected group |
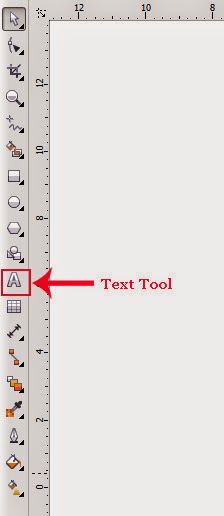
After that, select
Text Tool either by clicking on it in the Tool Box or by hitting
F8 on the keyboard.
 |
| Text Tool in the Tool Box |
As soon as you will do so, pointer of your mouse will assume the shape of a plus ( + ) sign with letter
A at the bottom-right of it. Then put that plus sign shaped pointer of your mouse right beside the recently made logo and type the phrase
“Douglas County Bank” there (press
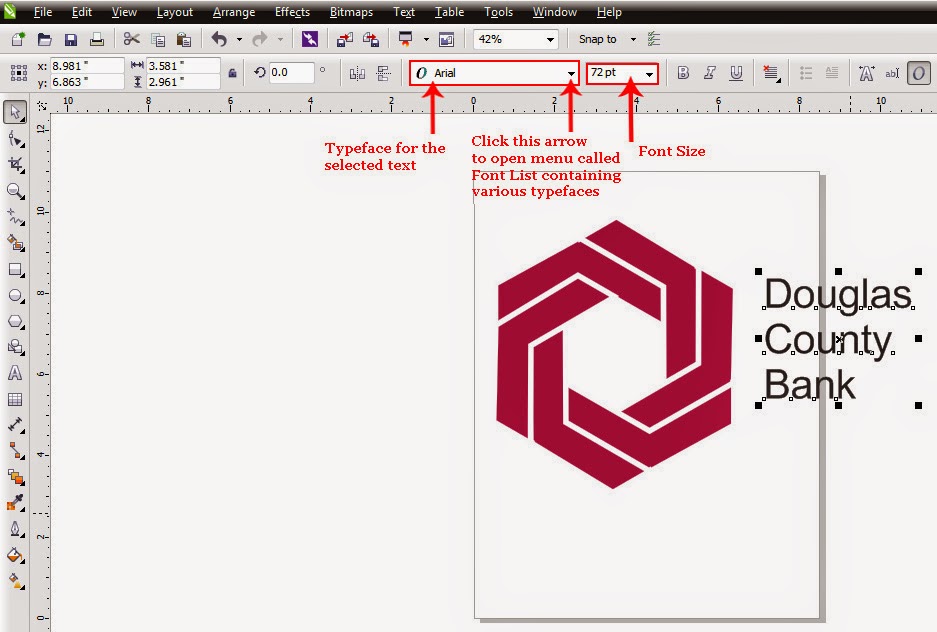
Enter after each word in the phrase). Then select that recently typed text with the help of
Pick Tool to have it’s properties in the Property Bar. Out of those properties, select
Arial as typeface for the selected text out of the options given in the drop-down menu called
Font List and select
72 ptout of the options given in the drop-down menu called
Font Size.
 |
| Recently typed text on the document and it's properties in the Property Bar |
After that, select the
Text Tool again either by hitting
F8 on the keyboard or by clicking on it in the Tool Box and type the phrase
“Member FDIC” right beneath the first phrase. Then select that recently typed phrase with the help of
Pick Tool and again select the option
Arial out of the various options given in the drop-down menu called
Font List and
set
Font Size for the selected text equal to
40 pt by typing the value in the relevant box and hitting the
Enter Key. As soon as you will hit the
Enter Key, selected text will assume the same size.
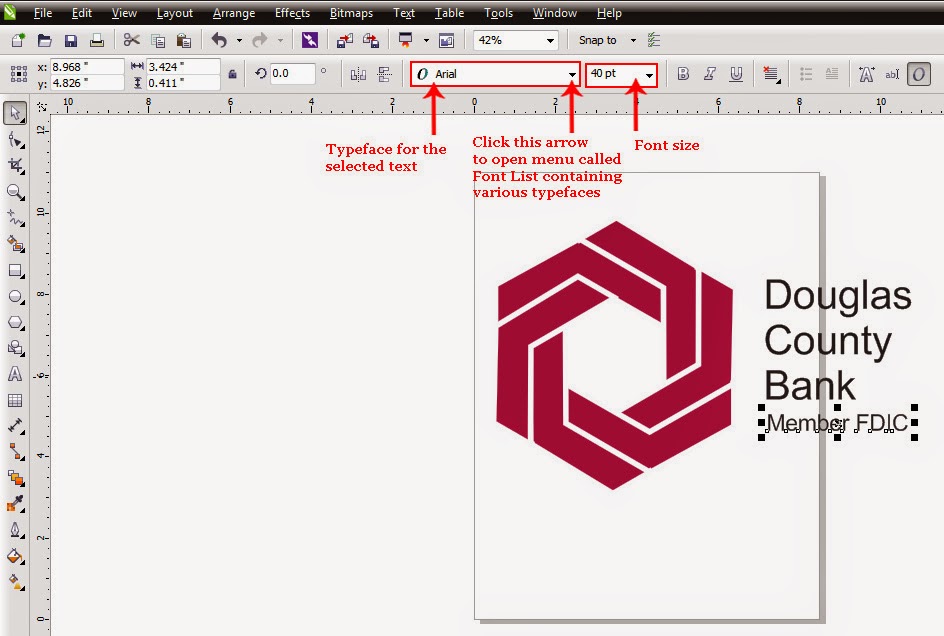 |
| Two phrases on the document having different Font Sizes by same typeface |
Then, select all the objects including the logo and the text on the document by hitting
CTRL + A and group them together by hitting
CTRL + G.
Then get inside the
File Menu and select the option
Saveor hit
CTRL + S to save the image in CDR format or in order to save the same image in any format other than CDR, select the option
Export given in the
File Menu or hit
CTRL + E on the keyboard. Having saved the logo in your required format you can use it anywhere you like by putting different backgrounds behind it according to your choice.
I hope you will find this post helpful and interesting. If so, kindly let me aware of that, by sharing your opinions and thoughts about the post in the form of your valued comments.


Posting Komentar