Often we come across different people, especially youngsters, too much worried about their outward looks especially about their uneven skin, dark circles around their eyes and pimples on their faces. They are often found consulting skin specialists and beauticians and spending large amount of time and money. Sometime their issues regarding their looks get resolved successfully after consulting skin specialists and beauticians, but unfortunately, sometime all their toil dashes to the ground and despite spending time and money appears no positive outcome and that is of course, extremely disappointing .
As I am neither a skin specialist nor a beautician myself, so I have in fact, no idea about how to help these youngsters in getting rid of this extremely sensitive issue (of course, or at least in my opinion, outward looks always matter too much for youngsters as well as the rest of the people) in reality. At the same time, it is always good for everyone to look beautiful in photographs too. But, how can one look beautiful in photographs with a face covered with pimples?
 |
| Uneven skin : Covered with pimples |
Fortunately, it is to look beautiful and pimple free in photographs is not as much difficult as it is in reality.
How to remove pimples using Adobe Photoshop?
In order to remove pimples out of a photograph’s face, one is supposed to follow the steps given below:
Open a picture with a face covered with pimples in Adobe Photoshop by selecting the option open out of thefile menu or by hitting CTRL + O.
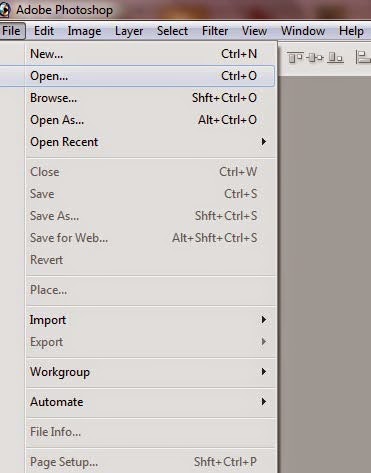 |
| File Menu: In order to open a picture click Open or hit CTRL + O |
Zoom that picture in by hitting CTRL + +.
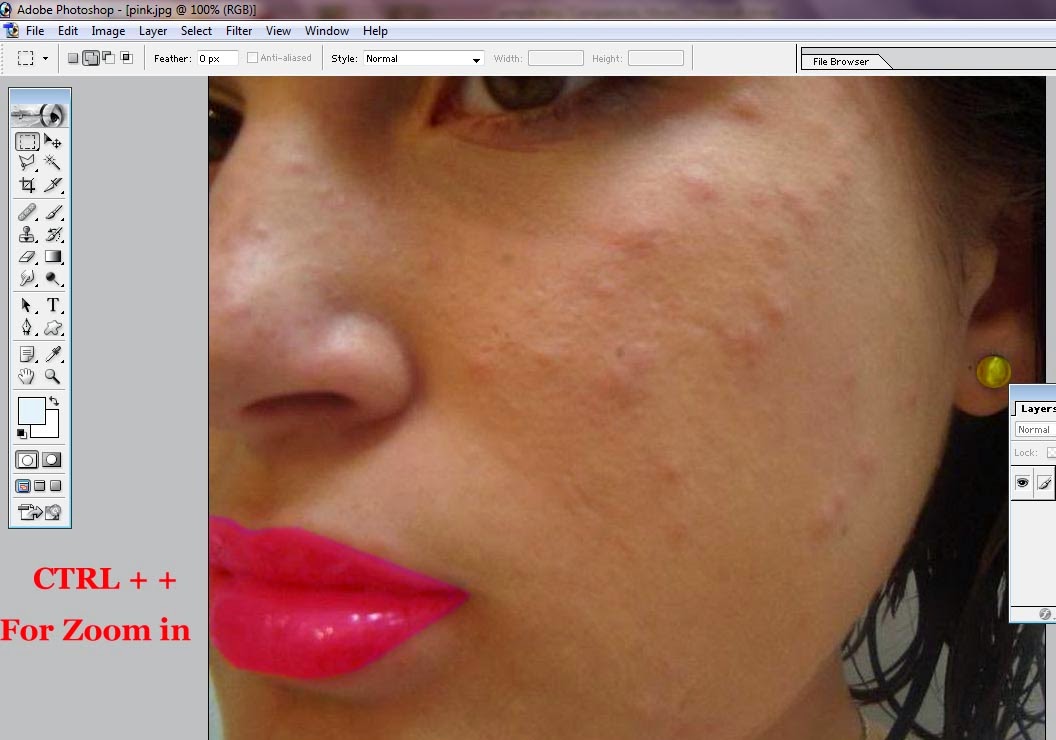 |
| Zoom in : Makes editing easier |
Healing Brush Tool
After zooming the picture in, select the Healing Brush Tool out of the tool window that can be seen usually at the left side of the Photoshop window. As soon as you will select the Healing brush Tool, the pointer of your mouse will assume the shape of a circle that is called Brush. Set the size of the brush according to the size of picture.
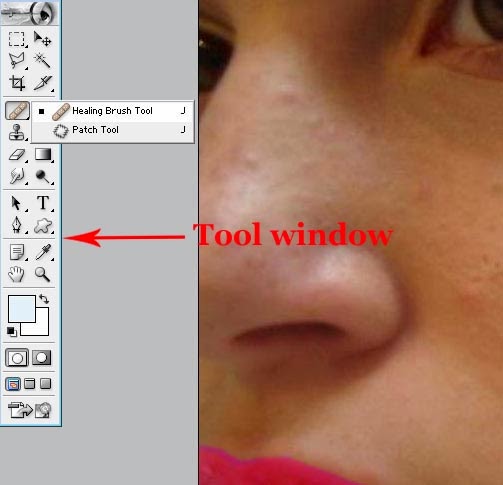 |
| Tool Window : Contains very useful Photoshop tools |
Size of this brush (as well as all the other brushes in Photoshop) can be changed according to necessary by hitting }(to increase the size of the brush) or { (to decrease the size of the brush). Further, size, hardness, spacing, roundness and angle of Healing brush Tool can also be specified by setting Diameter, Hardness, Spacing, Roundness and Anglein Brush Picker window.
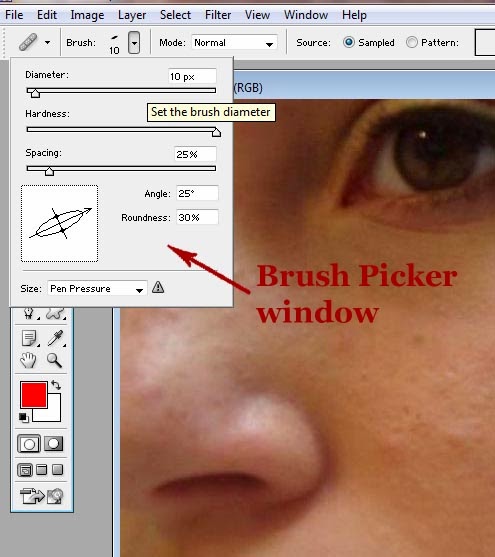 |
| Brush Picker Window : Set Diameter,Hardness, Spacing, Angle and Roundness of the brush |
Brush Picker Window
Brush Picker Window appears when you click the arrow that can be seen beside the second option that is called brush in the tool option bar right beneath the menu bar.
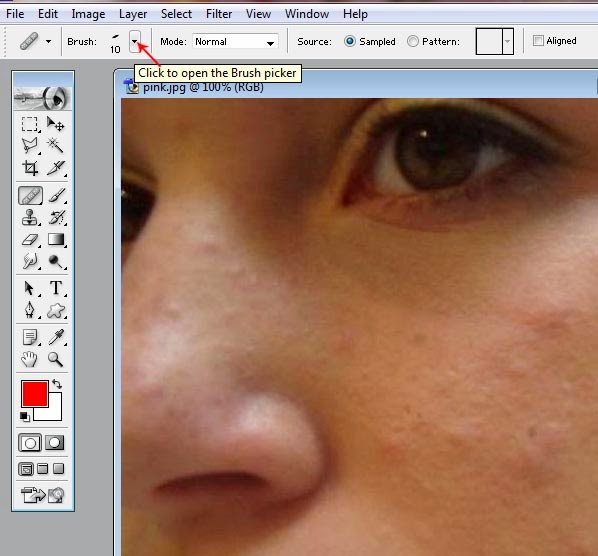 |
| Brush Picker : To open Brush Picker window click the arrow called Brush Picker |
Hardness and Diameter
If you want to use Healing Brush tool on human skin’s picture it's better to keep the hardness of the brush nearly 100%. As far as Diameter is concerned, size of the brush totally depends on it, Size of the brush gets larger and larger with the increase in diameter.
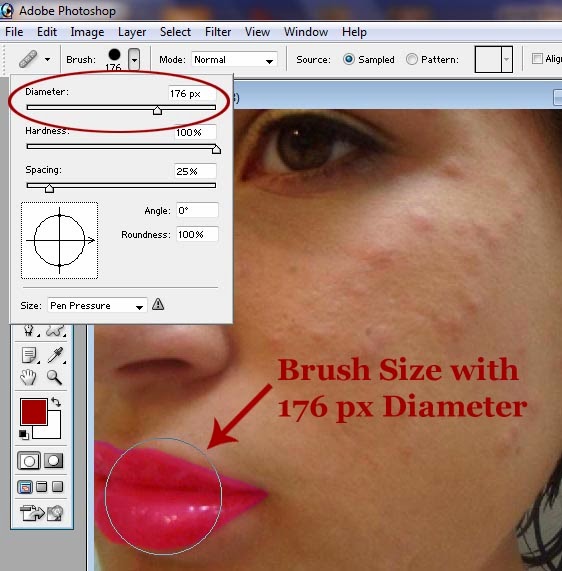 |
| Diameter: Size of the brush with 176 px diameter |
On the contrary, brush size gets shrunk with the decrease in diameter.
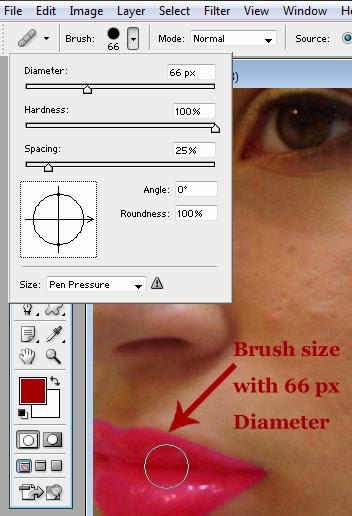 |
| Size of the brush with 66 px diameter |
Spacing
The option Spacing has very little or almost no importance while using the Healing Brush Tool. The main purpose of this option is to set the number of spaces between two supposed clicks when we drag our mouse keeping the left button of it pressed. In case you set less spacing e.g.35% and drag your mouse keeping the left button of it pressed, less spaces (35%) from you will be considered by the program (it's mean you have left only 35 spaces empty out of 100).
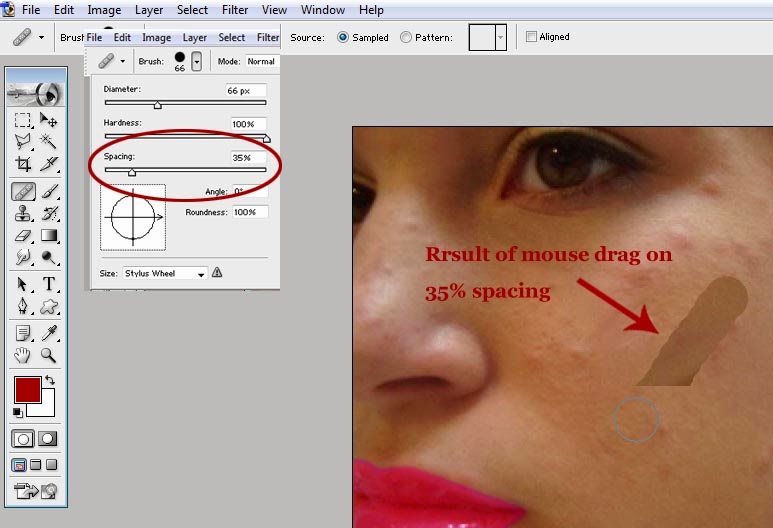 |
| Less spacing : Result of mouse drag with 35% spacing |
On the contrary, if you select more spacing e.g. 155% and drag your mouse while keeping the left button of it pressed, more spaces from you, definitely 155%, will be considered by the program. More spacing means less clicks while the less spacing means more clicks, that’s the formula.
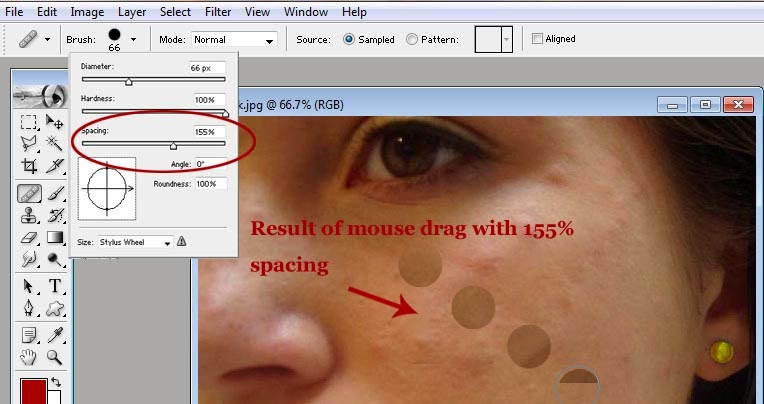 |
| Result of mouse drag with 155% spacing |
Angle
Through the option Angle you can set the angle of your brush and that definitely makes no difference while editing a picture using Healing Brush Tool.
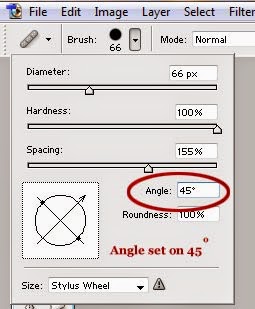 |
| Angle of Healing Brush tool |
Roundness
The option
Roundness is used to set the roundness of the brush which is set by default 100%.
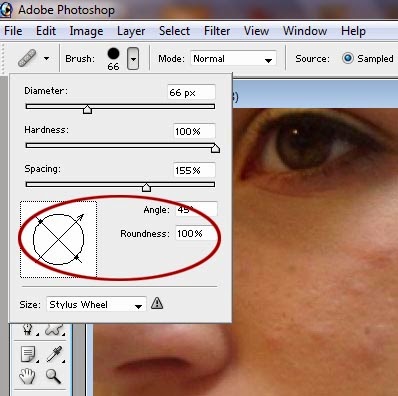 |
| Circle shaped Healing Brush with 100% roundness |
In case you set the roundness less than 100%, the shape of the brush will no longer look like a circle but it will turn into an ellipse.
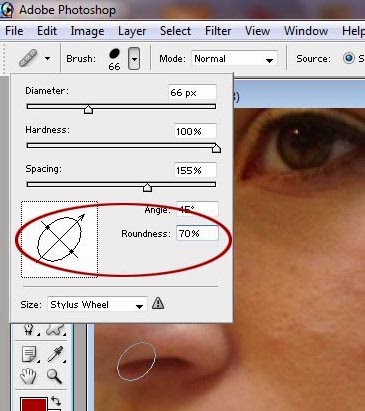 |
| Ellipse shaped Healing Brush with 70% roundness |
Well, the shape of the brush whether a circle or an ellipse, doesn't matter at all. As far as its use is concerned, both shapes work equally well. So, there is no need to worry about the
Angle and the
Roundness of the brush anymore.
In order to remove pimples, all setting which is supposed to be done is to set the hardness of the brush 100% and the selection of the mode
Normal out of the
Mode menu. We always select
Normal Mode when we want to keep intact all the original features of the picture save from the one we want to change intently.
As here we want to remove pimples intently.
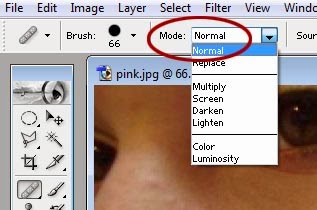 |
| Normal Mode : Save picture's original features |
After that, select
sampled out of the two
Source options. We select this option simply because we don't want to replace the pimply part of skin with any kind of pattern but the sample of the pimple free part.
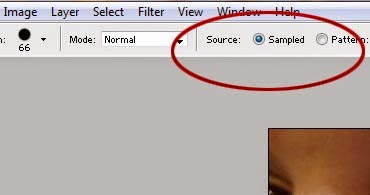 |
| Sampled: Source option used to create sample of the selected part of the picture at any place. |
Then ,finally, put the pointer of your mouse at the part of the picture’s face where skin looks totally neat and pimple free.
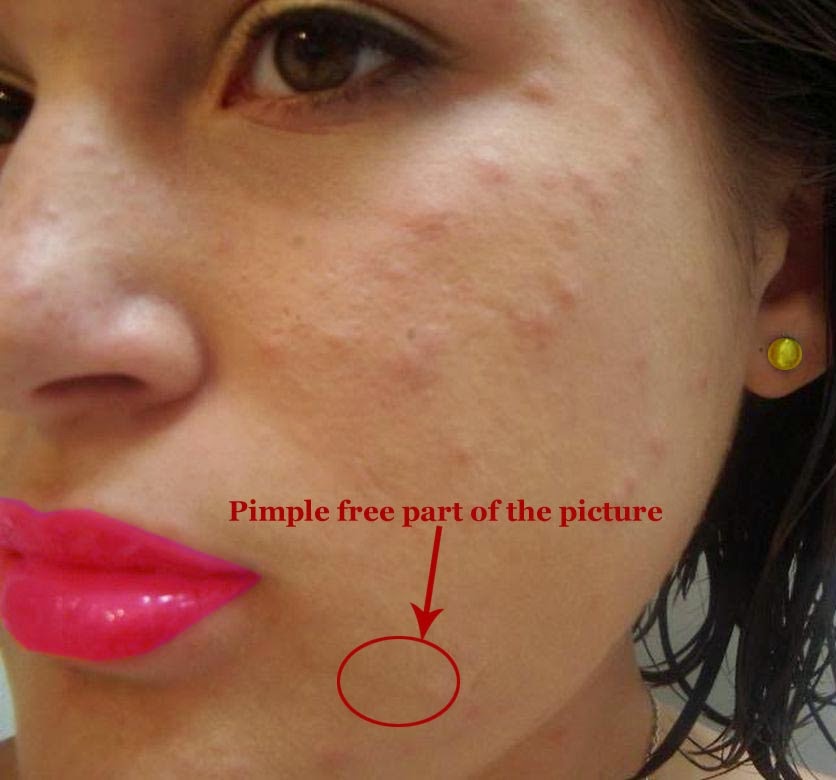 |
| Neat part of skin is used for sampling by Healing Brush tool |
Keep the
Alt key pressed and click the left button of your mouse once.Then put the pointer of your mouse at any pimply part of the picture and click once.
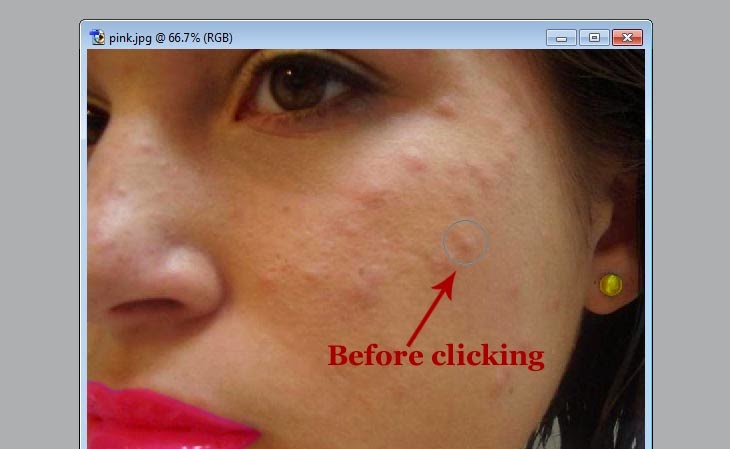 |
| Pimple : Before the use of Healing Brush Tool |
As soon as you will click the button pimple will disappear.
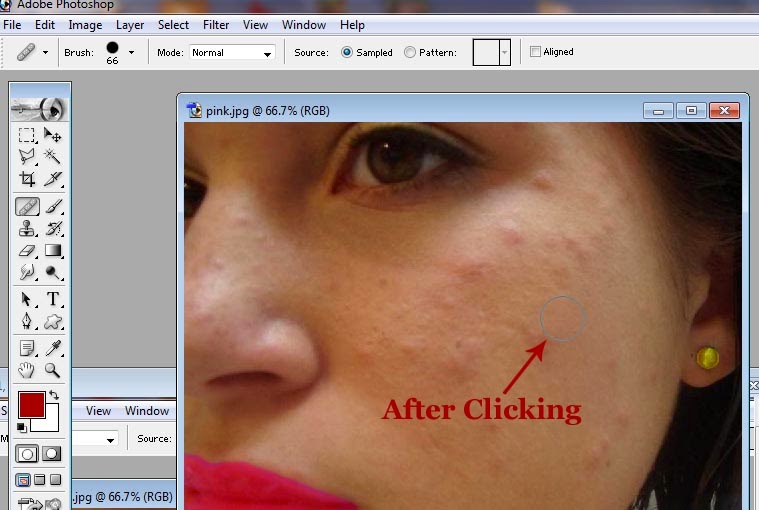 |
| Pimple completely vanished after the use of Healing Brush Tool |
Apply the same action one by one on all pimples and all of them will get disappeared after a single click and you will have your image totally pimple-free, neat and shiny without any unnatural effect.
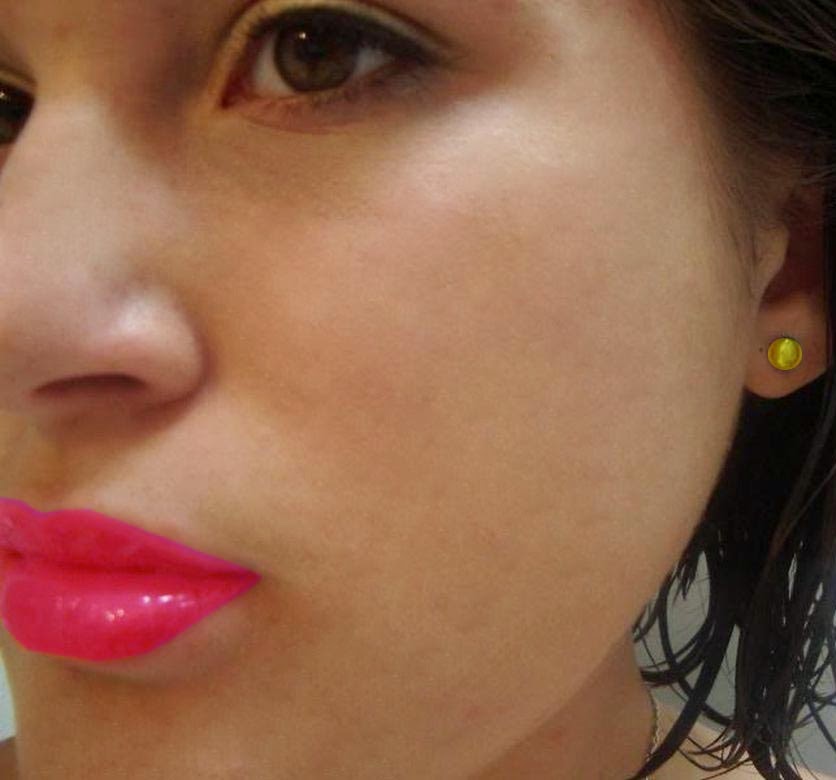 |
| Image: After the complete removal of pimples |
I am looking for your feedback, so please don't forget to subscribe your comments.


Posting Komentar