As I have explained in my earlier posts that it is very easy to transform a colored picture into black and white using
Desaturate command. When we apply Desaturate command on any image, there is left no need to change the color mode of that image (whether it be a
CMYK image or
RGB or
Lab image) into
Grayscale to transform it into black and white. All we need to do is to get inside the
Image Menu and select the option referred as
Adjustment. As soon as we select that option, there is appeared a side menu containing various options regarding image Adjustment. Out of those options we are supposed to select nothing but
Desaturate to discard all the color information out of that image. So that is how we can transform any image into black and white. For further detail see my post
Functionality of Desaturate in Photoshop.
As in Photoshop, we work on layers , so there is a possibility that we apply Desaturate command on some layers while at the same time keep rest of the layers fully colored. Sometime , in order to render unique and awesome look to different images, we add some color in some parts of a desaturated image. Apart from the addition of entirely different color from the one image contained before being desaturated, we can bring back precisely the same color image has lost after being desaturated.
 |
| Use History Brush and restore the lost color information in any part of a desaturated image |
As far as the addition of entirely different color in any part of a desaturated image is concerned, we can do so either by using
adjustment command named Hue/Saturation (I intend to explain in my oncoming post) or
adjustment layer named Hue/Saturation (I have explained in my earlier post
Desaturate command & Adjustment layer named Hue/Saturation). But whenever it comes to bring back the lost color information in any part of a desaturated image, we can either apply
History Brush Tool in that part of the image or we can use the method of
Layer Masks. In this post I have decided to explain the use of History Brush Tool in order to bring back the lost color information in any part of a desaturated image ,and as far as the other method (use of Layer Mask) is concerned, I intend to explain it later.
How to bring the lost color information back in a desaturated image using History Brush Tool?
First of all open your required image (preferably 8-bits RGB) in Photoshop. In case your required image is not an 8-bits RGB image (for instance it might be a 16-bits CMYK or 8-bits CMYK or 16-bits RGB or 8-bits Lab or 16-bits Lab image), you can transform it into 8-bits RGB quiet easily. In order to transform any image into 8-bits RGB all you need to do is to get inside the Image Menu and select the option named Mode. As soon as you will select that option, there will be appeared another menu containing different options regarding Modes. Out of those options , you are supposed to select two options referred as 8-bits Channel and RGBby putting checks beside these options according to the picture below.
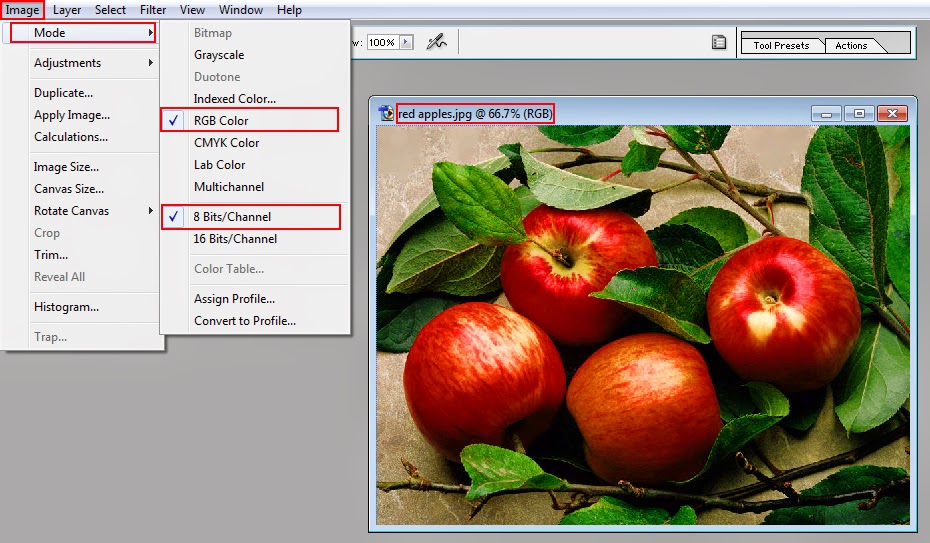 |
| 8-bits RGB image ready to be edited |
Note : 8-bits RGB is the most suitable color mode for any image that is going to be edited.
Having changed the color mode of the image into 8-bits RGB, the next thing which is supposed to be done right after that is the creation of a duplicate of the locked background layer that contains our image so that we could keep the original image perfectly intact while make changes in the duplicate of it. In order to create a duplicate of that layer, hit
CTRL + J on the keyboard. As soon as you will do so, there will be appeared another thumbnail in the layer palette indicating newly created duplicate of the locked background layer according to the picture below.
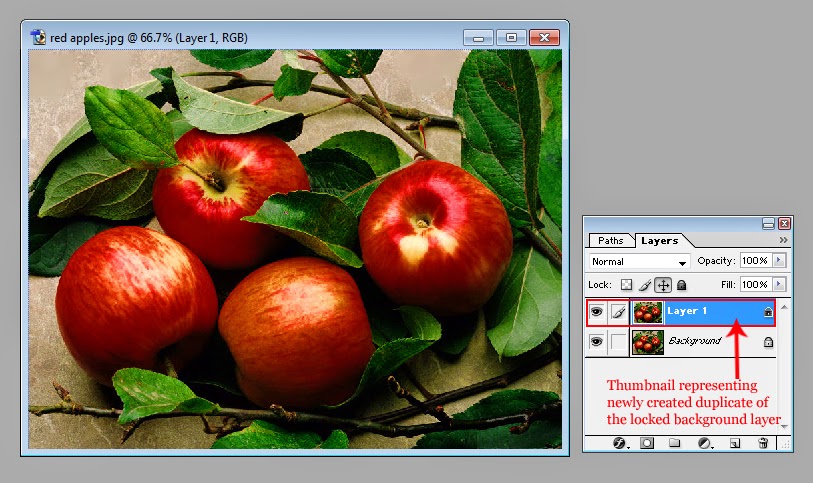 |
| Two identical thumbnails is the layer palette showing two identical layers |
Then , in order to transform that colored duplicate of the locked background layer into black and white, just get inside the
Image Menuand select the option named
Adjustment. As soon as you will select the option referred as
Adjustment given inside the
Image Menu of Photoshop, there will be appeared another menu containing a host of other options. Out of those options, select
Desaturate either by clicking on it or by hitting
CTRL + Shift + U on the keyboard.
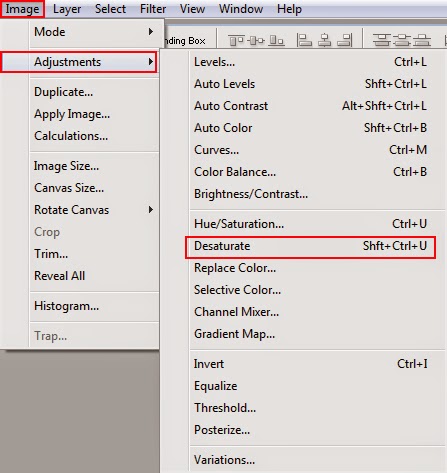 |
| Various commands inside the side menu of Adjustment along with Desaturate |
As soon as you will click on the option named
Desaturate given inside the side menu of
Adjustment or hit
CTRL + Shift +U on the keyboard, the colored picture on the selected layer will turn into back and white according to the picture below.
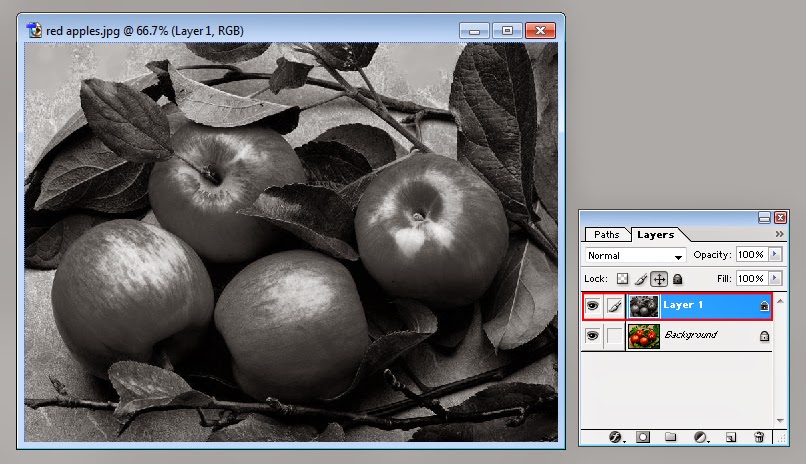 |
| Duplicate layer after being desaturated |
If you want to keep the desaturated form of the image perfectly intact too in the same document along with the original form of it, hit
CTRL + J on the keyboard one more time (this time to create a duplicate of
layer 1 that contains our desaturated image). As soon as you will do so, there will be appeared another thumbnail in the layer palette right above the thumbnail that is representing layer 1, indicating newly created duplicated of layer 1 according to the picture below.
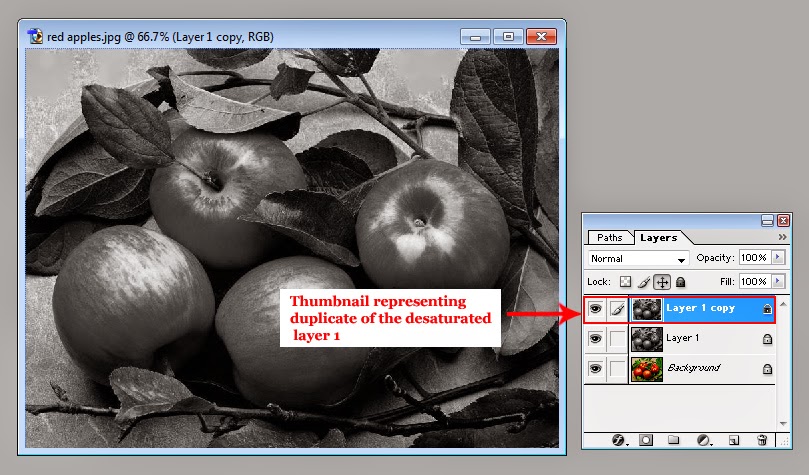 |
| Duplicate of the desaturated layer in the layer palette |
Then, in order to bring back precisely the same color in any part of the image that image has lost after being desaturated, we need to select
History Brush Tool. So, select
History Brush Tool by clicking on it in the tool panel.
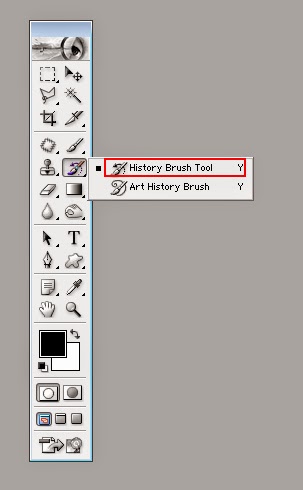 |
| History Brush Tool in the tool panel |
As soon as you will select that tool, the setting options for the
History Brush Tool will be appeared in the option bar and the pointer of your mouse will assume the shape of the currently selected brush in the option bar. In order to select appropriate brush type you need to open brush picker menu. For that purpose, click the small arrow that can be seen beside the currently selected brush in the option bar.
 |
| Option bar for History Brush Tool |
As soon as you will click that arrow, there will be appeared a Brush Picker menu containing a good number of options regarding brush types, sizes and styles. Out of the options given inside the Brush Picker menu , select a soft round brush of any size as at this stage, size of the brush doesn't matter at all and we can change it later according to our need either by hitting
} (to increase the size of the brush) or
{ (to decrease the size of the brush). Right beside the arrow that is supposed to be clicked to open Brush Picker menu, you can see a drop down menu referred as
Painting Mode. Out of the different options given inside the menu named
Painting Mode, select the option
Normal and set the
Opacity and
Flow for the strokes of the brush equals to
100% each according to the picture below.
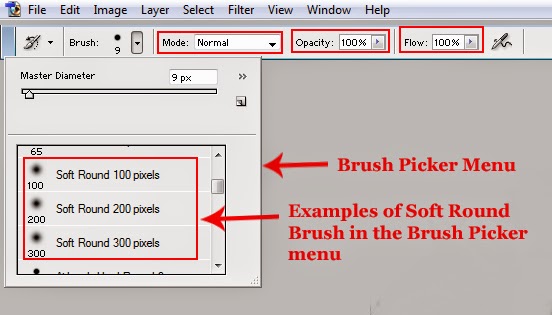 |
| Select a soft and round brush of any size, select Normal as Painting Mode, and set Opacity and Flow equals to 100% each |
After that, in order to make your work easier, zoom the picture in by hitting CTRL + + on the keyboard. Having zoomed the picture in, put the pointer of your mouse on any part of the duplicate desaturated layer (e.g. on apples), keep the left button of your mouse pressed and start to paint upon that part of the image by dragging your mouse. Each stroke of the brush will cause the restoration of the lost color in that part of the image according to the picture below.
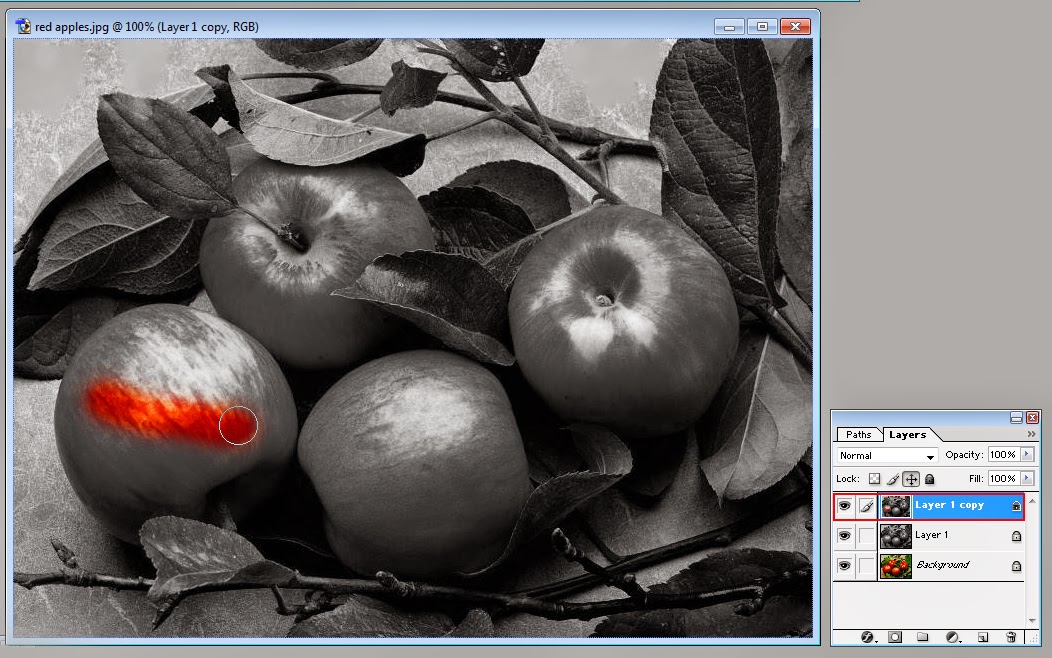 |
| Very first stroke of History Brush |
For your convenience you can increase or decrease the size of the brush simply by hitting
} (to increase the size of the brush) or
{ (to decrease the size of the brush) as I have explained earlier.
So that is how you can restore the lost color information in a destaurated image and give it a unique look using
History Brush Tool.
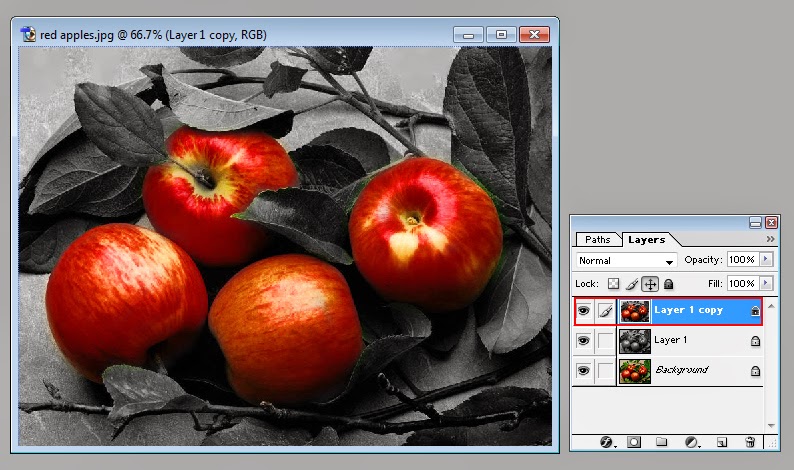 |
| Image with a look totally different from it's original aspect |
I hope all my readers will find this post help,interesting and easy to understand at the same time. If so , kindly let me aware of that by subscribing your comments.
Related PostsFunctionality of Desaturate in PhotoshopDesaturate command & Adjustment layer named Hue/Saturation


Posting Komentar