Halloween party ideas 2015

Whenever we work on Photoshop and use different commands, Photoshop keeps the complete record of all those commands in its memory in the form of separate files. When these files get corrupted, Photoshop starts to run sluggishly. In order to make it run faster you can use the command named Purge that is given inside the Edit Menu to delete those files.

Purge-Undo-in-Photoshop
Purge (Undo) helps to make Photoshop run faster
 Whenever you put the pointer of your mouse on the option named Purge, there is appeared a menu containing four commands referred as Undo, Clipboard, Historiesand  All. All these commands are used to delete corrupt files which makes Photoshop to run sluggishly.
As the topic is a bit lengthy as a whole, so I have decided to explain only the significance of the very first option  (Undo)  that is found inside the side menu of Purge with a very simple example while the rest of the options found inside the same menu, I intend to save for my oncoming posts.

Significance of Undo in the menu of Purge


This command is used to delete the record about the most recently applied command out of the computer’s memory that makes Undo command available inside the Edit Menu. In order to understand how that option works follow the instructions given below:
Create a new document with RGB color mode and white content specified.

White-content-for-the-Photoshop-document
Blank Photoshop document ready to be used
Then, add a new layer by clicking the small icon that can be seen right beneath the layer palette and referred as Create a new Layer.

New-layer-Completely-transparent
Totally invisible transparent layer is indicated by a thumbnail named Layer 1 in the layer palette
Then fill either Background or Foreground color inside the selected layer by hitting CTRL + Backspace (to fill Background color inside the selected layer) or ALT + Backspace (to fill Foreground Color inside the selected layer).

Light-green-Foreground
Layer 1 no longer transparent
After that,  if you click the tab named Edit in the menu bar to open Edit Menu, you will find  the command named Undo available there and ready to be used simply because  you have not purged the record of the most recently applied command (Fill) so far .

Edit-Undo-Fill-Layer
Undo Fill Layer is available inside the Edit Menu 
 In order to Purge that record, you are supposed to leave the command named Undo given inside the Edit Menu untouched but to click upon the option named Purge given inside the same menu. As soon as you will select that option, there will be appeared another menu containing four options referred as Undo, Clipboard, Histories and All as I have explained earlier. Out of those options,  select Undo to delete all the record about the most recently applied command. 

Edit-Purge-Undo
Select the option referred as Undo to delete corrupted files
 As soon as you will select that command, there will be appeared a dialogue box named Adobe Photoshop. In that dialogue box you will see a question This cannot be undone. Continue?

This-cannot-be-undone-Continue
Click OK to finish the task
All you need to do here is to click the button named OKin the same dialogue  box. As soon as you will click that button the dialogue box will get out of sight and the record about the most recently applied command will be deleted out of the computer’s memory.
After that, open the Edit Menu again and  you will notice that the formerly available option Undo will no longer remain available inside  that menu.

Edit-Undo-Unavailable
Undo command is not available inside the Edit Menu

So that is how you can make Photoshop run faster by using the command named Undo given inside the menu of Purge. I am sure all my readers will find this post helpful, if so, kindly let me aware of that by subscribing your comments.


As I have explained in my earlier posts that it is very easy to transform a colored picture into black and white using Desaturate command. When we apply Desaturate command on any image, there is left no need to change the color mode of that image (whether it be a CMYK image or RGB or Lab image) into Grayscale to transform it into black and white.  All we need to do  is to get inside the Image Menu and select the option referred as Adjustment. As soon as we select that option, there is appeared a side menu containing various options regarding image Adjustment. Out of those options we are supposed to select nothing but Desaturate to discard all the color information out of that image. So that is how we can transform any image into black and white. For further detail see my post Functionality of Desaturate in Photoshop.
As in Photoshop, we work on layers , so there is a possibility that we apply Desaturate command on some layers while at the same time keep rest of the layers fully colored. Sometime , in order to render unique and awesome look to different images, we add some color in some parts of a desaturated image.  Apart from the addition of entirely different color from the one image contained before being desaturated, we can bring back precisely the same color image has lost after being desaturated.

very-important-tool-of-Photoshop-History-Brush
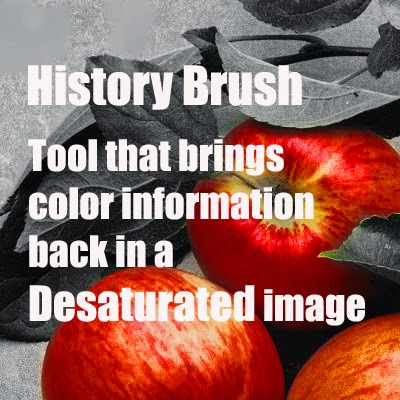
Use History Brush and restore the lost color information in any part of a desaturated image 
As  far as the addition of entirely different color in any part of a desaturated image is concerned, we can do so either by using adjustment command named Hue/Saturation (I intend to explain in my oncoming post) or adjustment layer named Hue/Saturation (I have explained in my earlier post Desaturate command & Adjustment layer named Hue/Saturation). But whenever it comes to bring back the  lost color information in any part of a desaturated image,  we can either apply History Brush Tool in that part of the image or we can use the method of Layer Masks.  In this post I have decided to explain the use of History Brush Tool  in order to bring back the lost color information in any part of a desaturated image ,and as far as the other method  (use of Layer Mask) is concerned, I intend to explain it later.

How to bring  the lost color information back in a desaturated image using History Brush Tool?


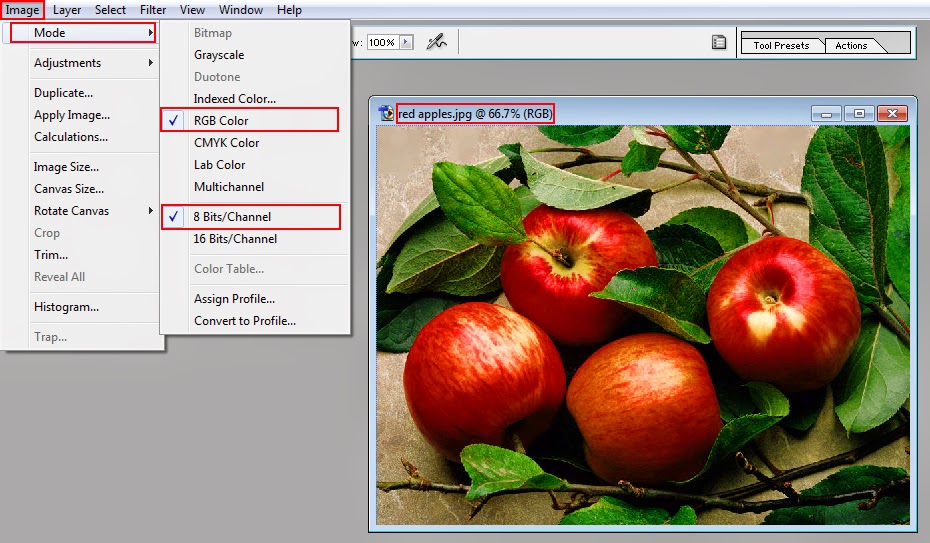
First of all open your required image (preferably 8-bits RGB)  in Photoshop. In case your required image is not an 8-bits RGB image (for instance it might be a 16-bits CMYK or 8-bits CMYK or 16-bits RGB or 8-bits Lab or 16-bits Lab image), you can transform it into  8-bits RGB quiet easily. In order to transform any image into 8-bits RGB all you need to do is to get inside the Image Menu and select the option named Mode. As soon as you will select that option, there will be appeared another menu containing different options regarding Modes. Out of those options , you are supposed to select two options referred as  8-bits Channel and RGBby putting checks beside these options according to the picture below.
8-bits-RGB-the-the-most-suitable-image-for-editing
8-bits RGB image ready to be edited
Note : 8-bits RGB is the most suitable color mode for any image that is going to be edited.
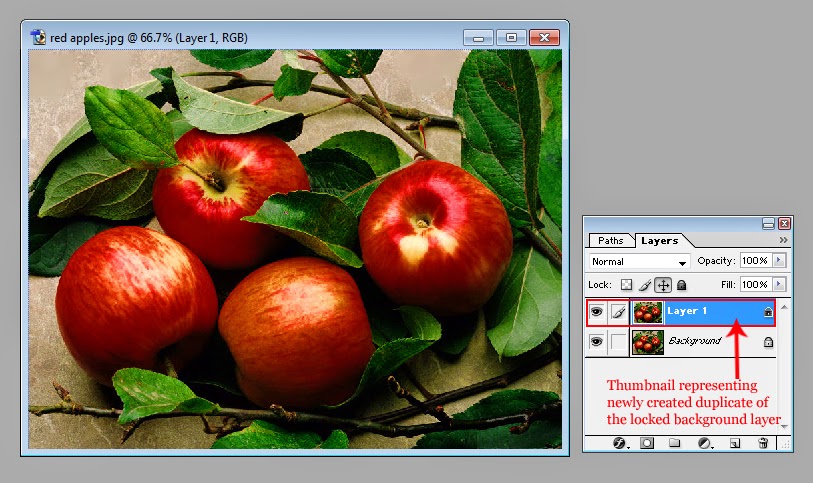
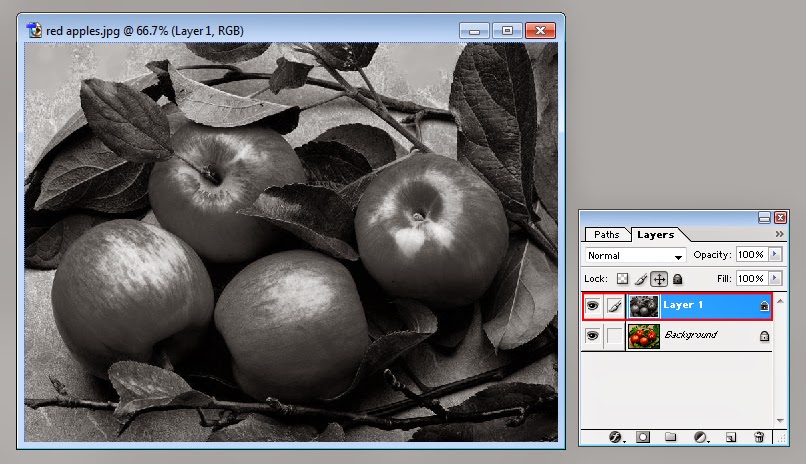
 Having changed the color mode of the image into 8-bits RGB,  the next thing which is supposed to be done right after that is the creation of  a duplicate of the locked background layer that contains our image so that we could keep the  original image perfectly intact while make changes in the duplicate of it.  In order to create a duplicate of that layer, hit CTRL + J on the keyboard.  As soon as you will do so, there will be appeared another thumbnail in the layer palette indicating newly created duplicate of the locked background layer according to the picture below.

Thumbnail-represents-new-duplicate-layer
Two identical thumbnails is the layer palette showing two identical layers
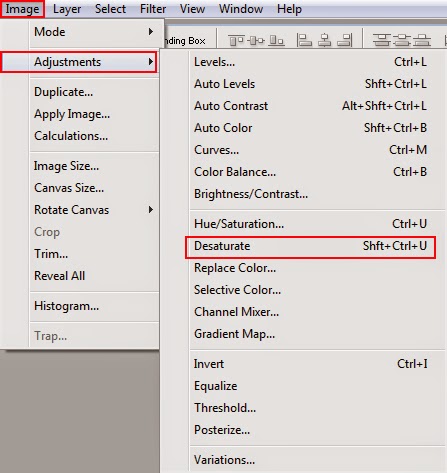
Then , in order to transform that colored duplicate of the locked background layer into black and white, just get inside the Image Menuand select the option named Adjustment. As soon as you will select  the option referred as Adjustment given inside the Image Menu of Photoshop, there will be appeared another menu containing a host of other options.  Out of those options, select Desaturate either by clicking on it or by hitting CTRL + Shift + U on the keyboard.

Desaturate-command-can-be-seen-in-the-Adjustment-sub-menu
Various commands inside the side menu of Adjustment along with Desaturate
As soon as you will click on the option named Desaturate given inside the side menu of Adjustment or hit CTRL + Shift +U on the keyboard, the colored picture on the selected layer will turn into back and white according to the picture below.

Locked-grey-layer
Duplicate layer after being desaturated
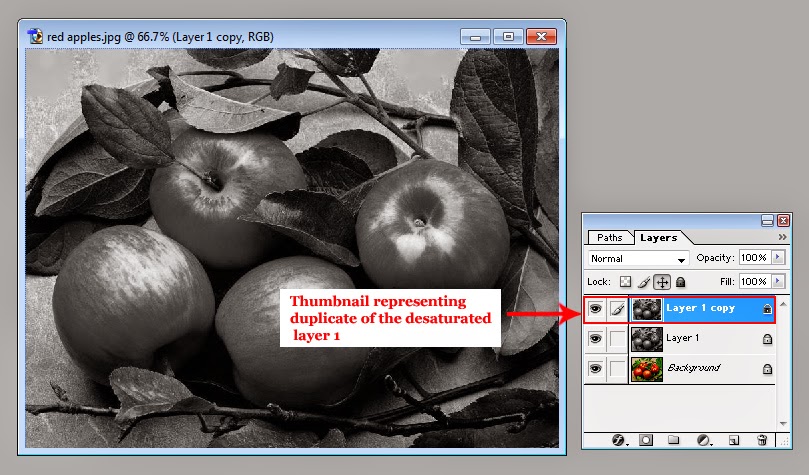
If you want to keep  the desaturated  form of the image perfectly intact too in the same document along with the original form of it, hit CTRL + J on the keyboard one more time (this time to create a duplicate of layer 1 that contains our desaturated image). As soon as you will do so, there will be appeared another thumbnail in the layer palette right above the thumbnail that is representing layer 1, indicating newly created duplicated of layer 1 according to the picture below.

Two-grey-and-one-colored-layers
Duplicate of the desaturated layer in the layer palette
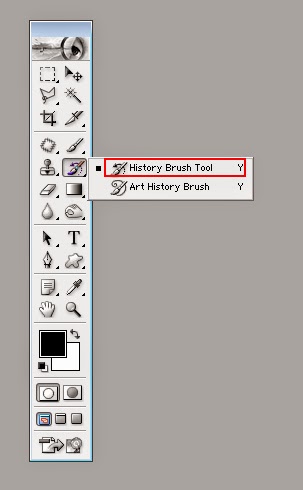
Then, in order to bring back precisely the same color in any part of the image that image has lost after being desaturated, we need to select History Brush Tool. So, select History Brush Tool by clicking on it in the tool panel.
History-Brush-and-Art-History-Brush
History Brush Tool in the tool panel
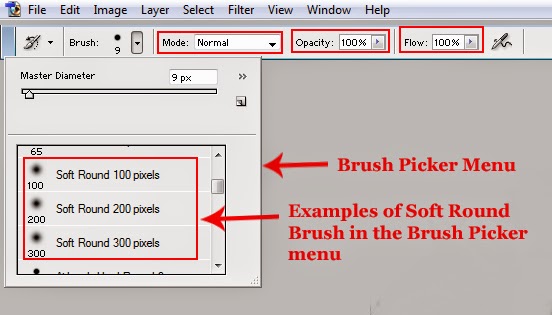
As soon as you will select that tool, the setting options for the History Brush Tool will be appeared in  the option bar  and the pointer of your mouse will assume the shape of the currently selected brush in the option bar. In order to select appropriate brush type you need to open brush picker menu. For that purpose, click the small arrow that can be seen beside the currently selected brush in the option bar.
How-to-open-brush-picker
Option bar for History Brush Tool
 As soon as you will click that arrow, there will be appeared a Brush Picker menu containing a good number of options regarding brush types, sizes and styles.  Out of the options given inside the Brush Picker menu , select a soft round brush of any size as at this stage, size of the brush doesn't matter at all and we can change it later according to our need either by hitting } (to increase the size of the brush) or { (to decrease the size of the  brush).  Right beside the arrow that is supposed to be clicked to open Brush Picker menu, you can see a drop down menu referred as Painting Mode. Out of the different options given inside the menu named Painting Mode, select the option Normal and set the Opacity and Flow for the strokes of the brush equals to 100% each according to the picture below.
Soft-round-brushes-of-different-sizes
Select a soft and round brush of any size, select Normal as Painting Mode, and set Opacity and Flow equals to 100% each
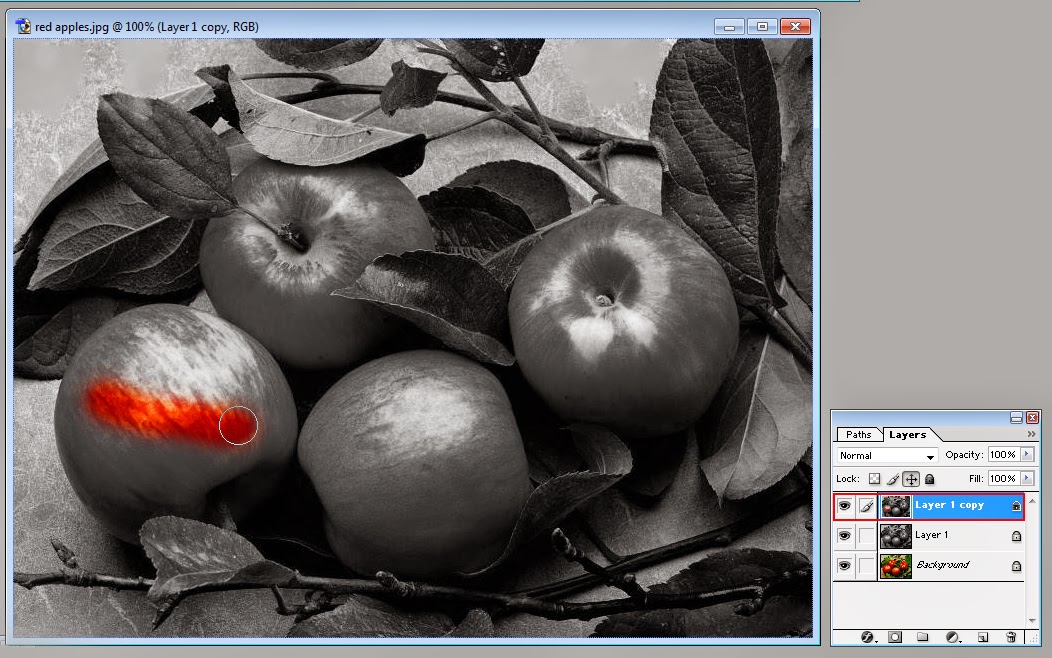
After that, in order to make your work easier, zoom the picture in by hitting CTRL + + on the keyboard. Having zoomed the picture in, put the pointer of your mouse on any part of the duplicate desaturated layer (e.g. on apples), keep the left button of your mouse pressed and start to paint upon that part of the image by dragging your mouse. Each stroke of the brush will cause the restoration of the lost color in that part of the image according to the picture below.

Restoration-of-lost-hue
Very first stroke of  History Brush
For your convenience you can increase or decrease the size of the brush simply by hitting } (to increase the size of the brush) or { (to decrease the size of the brush) as I have explained earlier.
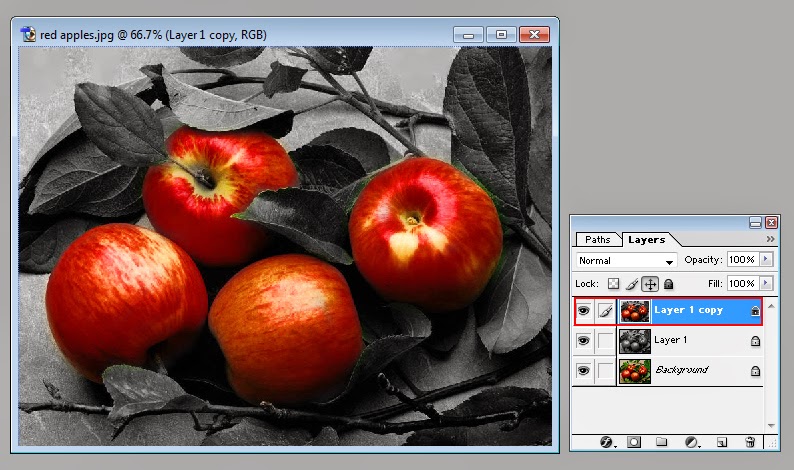
So that is how you can restore the lost color information in a destaurated image and give it a unique look using History Brush Tool.
Color-has-been-restored-through-History-Brush
Image with a look totally different from it's original aspect
I hope all my readers will find this post help,interesting and easy to understand at the same time. If so , kindly let me aware of that by subscribing your comments.


Related Posts

Functionality of Desaturate in Photoshop
Desaturate command & Adjustment layer named Hue/Saturation

Desaturate is a command that sucks all the colors out of a colored picture and makes it look like a Grayscale image. In order to find this command you are supposed to get inside the Image Menu and select the option named Adjustment. In the side menu of Adjustment you can find a host of commands along with Desaturate. Though,  desaturated RGBCMYK and Lab  images look like  Grayscale images but the difference is that you can render awesome look to desaturated images by adding colors in different parts of these images using different tools and commands ( e.g. Brush Tool, History Brush Tool, Hue and Saturation, Fill and Pattern Stamp Tool etc). But as far as the Grayscaleimages are concerned, there is no way to add any color  other than black, white and different shades of gray in those images.

apply-the-command-named-desaturate
Desaturate makes a colored picture looks like a Grayscale image

How to transform a colored picture into black and white without changing its color mode into Grayscale


In order to understand how this command works follow the instructions given below.
First of all open a colored image, preferably RGB, in Photoshop (as RGB is the most suitable color mode for image editing) according to the picture below.
Zara-sheikh-RGB
RGB image before being desaturated
Then, in order to desaturate that image, just get inside the Image Menu and select the option named Adjustment. As soon as you will select that option, there will be appeared  another menu containing various adjustment options including Desaturate.  Out of those options select Desaturate either by clicking on it in the menu or by hitting CTRL + Shift + U on the keyboard.

Image-Adjustment-Desaturate
/Desaturate in the side menu of Adjustment

 As soon as you will do so, the image will turn black and white having lost all the colors according to the picture below.

Desaturated-locked-background-layer
Image on the locked background layer has been desaturated
As in the  image given above, you can see that it was the locked background layer that contained the image we have desaturated and after applying the command, we have lost the original image.If you want to keep the original image intact,  don’t apply the command named Desaturate on the locked background layer. Just create a duplicate of the background layer by hitting CTRL + J on the keyboard and then apply the command named Desaturate on that duplicate instead of the background layer according to the picture below.

Duplicate-desaturated-layer-in-the-layer-palette
Two locked layers in the layer palette
There are many ways through which you can add different colors in the different parts of  desaturated images and give awesome look to  those images. Some of such ways I intend to explain in  my oncoming tutorials.
I am certain, this post will be proved helpful to all my readers. If so, kindly let me aware of that by subscribing your comments.

As I have explained in my earlier post that through the command named Desaturate you can transform a colored picture ( RGB, CMYK or Lab) into something look like a Grayscale image. The difference between desaturated RGB, CMYK or Lab images and  Grayscale images is that we can add different colors in desaturated images  using different tools and commands, but in case of Grayscale images , there is no way to add any color other than black white and different shades of gray in the image . It is extremely simple to transform a colored image whether it be a CMYK , RGB or Lab image into black and white by applying the command named Desaturate upon it.  All you need to do it to open the image in Photoshop and hit CTRL + Shift +U on the keyboard. As soon as these keys will be pressed, the image will lose all the color information  and turn into black and white. In case you forget these short cut keys, then simply click the image tab on the menu bar of Adobe Photoshop to open Image Menu. Then select the option named Adjustment to open the Adjustment Menu containing various commands. Out of those commands select Desaturate by clicking on it and just one click will discard all the information regarding colors and transform the image into black and white.

use-for-adjustment-layer-named-Hue-Saturation
Give awesome look to different images 

Having applied Desaturate command on any image you can apply various tools on the image to give it unique and awesome look. In this post I am going to explain a very simple method through which you can add color in a desaturated image using  adjustment layer named  Hue/Saturation .

How to add color in a desaturated image using adjustment layer named Hue/Saturation?


First of all open a colored picture in Photoshop, preferably 8-bits RGB (as 8-bits RGB is the most suitable color mode for any image that is going to be edited). In case you don’t have any 8-bits RGB image for that experiment, you can easily convert any image into 8-bits RGB. In order to convert the color mode of any CMYK or Lab image into 8-bits RGB, all you need to do is to get inside the Image Menu and select the option named Mode. As soon as you will select that option, there will be appeared a side menu showing different color modes you can apply on your image. Out of those modes select RGB and 8-bits/Channel by clicking on each and in an instant your image will be transformed into 8-bits RGB.For instance in the image given blow you can see a  16-bits CMYK image which is not at all suitable for any sort of editing. 
CMYK-Color-Mode-and-16-bits-channel
Image not at all suitable for editing
CMYK is a color mode that is suitable for printing different  images on paper and at the same time, not at all suitable for editing images while 16-bits channel doesn't allow the use of most of the tools (including Move ToolBrush ToolEraser ToolClone and Pattern Stamp ToolsBurn ToolBlur Tool etc) on the image as 8-bits channel allows. Further, while working with 16-bits channel, you cannot add any layer in the document as you can do while working with 8-bits channel. So before applying any command upon that image it is better to transform that image from 16- bits CMYK to 8-bits RGB by putting checks beside the options RGB and 8-bits/Channel given in the side menu of Mode according to the picture below.

RGB-Color-Mode-and-8-bits-channel
Image suitable for editing
Having converted the color mode of the image into 8-bits RGB, the next thing which is supposed to be done is the creation of  a duplicate of the locked background  layer. In order to create a duplicate of that layer hit CTRL + J on the keyboard . As soon as you will do so, there will be appeared another thumbnail  containing the same image in the layer palette right above the background layer according to the picture below.
New-thumbnail-in-the-layer-palette
Two thumbnails in the layer palette containing two identical layers
After that, desaturate the image on the duplicate layer either by hitting Shift + CTRL +U on the keyboard or by selecting the command named Desaturate given inside the Image Menu’s option Adjustment’s side menu according to the picture below.

Image-Adjustment-Desaturate
Option name Desaturate given inside the Adjustment Menu
As soon as you will select that command,  all the colors in the selected layer will be transformed into black, white and different shades of gray according to the picture below.

Layer-1-after-being-desaturated
Image showing no color but black, white and different shades of grey
Having desaturated the selected layer, make selection of any part of it using any selection tool (as I have decided to add color in the lips only and keep rest of the layer black and white so I’ll make selection of lips using Polygonal Lasso Tool).  So select Polygonal lasso tool by clicking on it in the tool panel according to the picture below.

Lasso-tool-Polygonal-lasso-Tool-Magnetic-Lasso-Tool
Polygonal Lasso Tool  in the Tool Panel
As soon as the Polygonal Lasso Tool will be selected, pointer of your mouse will assume the shape of Polygonal Lasso Tool icon and the setting options of the same tool will be appeared in the option bar that can be seen usually right beneath the menu bar. Out of those options select  New selection as selection type , set Feather equal to 0 px and put check inside the check box named Anti-aliased to keep the edges of the selected area smooth and appealing according to the picture below.

New-Selection-Feather-Anti-aliased
Set the Selection Type and Feather and put check inside the check box named Anti-aliased
Having done that setting, zoom the picture in by hitting  CTRL + + on the keyboard once or twice to make selection easier. Having zoomed the picture in, put the Polygonal Lasso Tool shaped pointer of your mouse on any point at the edge of lips’ outline and click the left button of your mouse once.  As soon as you will do so, selection thread will be stuck to that point according to the picture below.

Starting-point-of-selection
Selection is being started
Then trace the outline of lips by dragging your mouse and clicking the left button of it every time you feel any need to change the direction of selection according to the picture below.

A-host-of-clicks
Clicks on different places while making selection
Then end the selection of lips at the same point you started it by clicking the left button of your mouse on the same point according to the picture below.

Complete-tracing
End the selection of lips on the same spot you started it
Having finished the tracing , hit Enter to complete the selection.  As soon as you will hit Enter, the selection thread will be vanished and the edges of selected area will begin to glimmer according to the picture below.
Selected-lips
Glimmering edges around  lips are indicating that this  part of the layer  is selected
Then, in order to add some  color inside the selected part of the layer through Hue/Saturation dialogue box you need to create a new Adjustment layer.  To create that layer click the small icon that can be seen right beneath the layer palette and says Create new fill or adjustment layer every time having been hovered over.

Fill-or-Adjustment-layer-icon
Icon named Create a new fill or adjustment layer
 As soon as you will click that icon, there will be appeared a menu containing various options including Hue/Saturation. In order to create a new adjustment layer, and to open Hue/Saturation dialogue box , select  the option Hue/Saturation by clicking on it.

Click-on-hue/saturation
Adjustment layer menu
As soon as you will select that option, the glimmering edges of the selected part of the layer will be disappeared  and there will be appeared two thumbnails  in the layer palette right above  layer 1, representing newly created adjustment layer and a layer mask. Further, along with these two thumbnails in the layer palette, there will be appeared a dialogue box named Hue/Saturation according to the picture below.

Adjustment-layer-with-layer-mask-and-Hue-Saturation
Newly created adjustment layer and layer mask in the layer palette along with dialogue box named Hue/Saturation
In the dialogue box named Hue/Saturation, you can see a drop-down menu named Edit, three sliders under the heads of Hue, Saturation and Lightness,  three inactive Eyedropper Tools and two small check boxes named Colorize and Preview along  with some buttons.

In order to add color in the formerly selected part of the image through this dialogue box , first of all, put check inside the check box named Colorize. As soon as you will do so, the formerly active drop-down menu named Edit will get inactive. After that all you need to do is to put check inside the other check box named Preview  so that you could watch the preview of different settings of hue, saturation and lightness and to move the sliders from left to right or from right to left to achieve desired color with desired intensity for the formerly selected part of the image. For instance if you set the slider named Hue at the position of 0, slider named Saturation at the position of 100 and the slider named Lightness at the position of 0 the result will be the bright red color inside the formerly selected part of the image according to the picture below.

bright-red-lips
Hue, Saturation and Lightness have been set at the positions of  0, 100, 0 respectively
In case you set set the slider named Hue at the position of 310, slider named Saturation at the position of 81 and the slider named Lightness at the position of -67 the result will be the dark purple or magenta color inside the formerly selected part of the image according to the picture below.

dark-purple-lips
Hue, Saturation and Lightness have been set at the positions of  310, 81,- 67 respectively
In order to apply any setting finally upon the image click the button named OK.

So that is is how you can add color in any selected part of a desaturated image using adjustment layer named Hue/Saturation. Apart from all this, there is another  big advantage associated with this method. That is, by showing and hiding different layers in the document  you can save a single image with different aspects. For instance, if you hide the layer named Hue/Saturation by hiding the small eye shaped icon beside it (in order to hide small eye shaped icon beside any layer, all you need to do is to click on that icon once), you will be able to save a totally black and white image in JPEG, PNG or any other format like the image  below.

Hue/Saturation-layer-is-hidden
Image looks completely black and white when you hide the layer named Hue/Saturation 
In case, you hide both layers named Hue/Saturation and Layer 1 together by clicking the small eyes shaped icons beside each of  these layers,  you will be able to save the image in its initial undedited form according to the picture below.

Locked-background-layer-is-not-hidden
 Visible Background layer containing image in its original aspect

And if you hide  Layer 1 only and keep the Background layer and the layer named Hue/Saturationunhidden, you will be able to save the image in the form you can see in the picture below.

No-desaturation
Image with layer 1 completely invisible
And if you keep all the layers visible you will be able to save a black and white image with colored lips as you have seen earlier in this post.
I am sure all my readers will find this post helpful and interesting so have fun with it, but kindly don't forget to subscribe your comments.


Adobe Photoshop allows you to fill any solid color as well as any predefined pattern with desired level of opacity and required blending mode into any selected part of the selected layer through the command named Fill
Fill-command-in-Photoshop
Fill command is used to fill solid colors and patterns inside the layers while Black, White and 50% gray inside the layer masks

How to use Fill command properly in Photoshop?


In order to understand the full functionality of this command, follow the steps given below:
First of all create a new Photoshop document with RGB color mode and white content specified.

Whit-Photoshop-document
Newly created blank PSD file
Then ,set blue as Foreground Color and yellow as Background Color in the Tool Box.

Yellow-and-blue-selected-foreground-and-background-colors
Selected Foreground and Background Colors in the Tool panel
Then, get inside the Edit Menu and select the option named Fill by clicking on it.

Photoshop-Menu-Bar-Edit-Menu-Fill
Option named Fill in the Edit Menu of Photoshop
As soon as the option named Fill will be selected, there will be appeared a dialogue box named Fill. 
Fill-dialogue-box
 Dialogue box referred as Fill appears every time you select the command named Fill
In that dialogue box there will be seen two separate pans under the heads of Contents and Blending. 

Contents

 Inside the pan referred as Contents there will be seen a drop-down menu named Use. The Content you will find selected here by default will be none other than Foreground Color. In order to find rest of the filling options, the tiny black arrow beside the drop-down menu named Use is supposed to be clicked. As soon as you will click that arrow there will be appeared a menu containing three sections.

Select-any-content-for-layer-or-layer-mask
Three sections in the menu named Use


The First Section (Foreground and Background Colors)


First section consists of two options which are referred as Foreground Color and Background Color. If you select Foreground Color out of these two options and click the button named OK, the color that has been selected as Foreground Color (blue in the case) in the Tool Panel, will be filled inside the selected layer according to the picture below.

blue-layer
Locked background layer with Foreground Color  filled inside
 If you select Background Color out of those two options instead of Foreground and click the button named OK, the color that has been selected as Background Color (yellow in this case) in the Tool Panel, will be filled inside the selected layer.

yellow-layer
Locked background layer with Background Color filled inside

 The Second Section (Pattern and History)


The second section of the menu named Use is also consists of two options which are referred as Pattern and History. If you select the option named Pattern out of these two options, the formerly inactive option named Custom Pattern will get activated all by itself. If you click the small arrow that can be seen right beside the pattern thumbnail, you will find a pattern picker menu containing different patterns as you can see in the picture below.
Patterns-in-Photoshop
Different pattern styles
Whichever pattern you will select out of those patterns, the same pattern will be filled inside the selected layer as soon as you will hit the button named OK.

Colorful-pattern
Locked background layer with pattern filled inside

If you select the other option named History given in the same section, the selected layer will be filled with the same content that had been selected during the creation of the document in the dialogue box named New. For instance during the creation of the document you had selected White as document content and here in this section you select the option named History, the selected layer will turn white again.


 The Third Section (White, 50% Gray and Black)


The third section in the same menu contains three options which are referred as White, 50% Gray and Black. Though these three options can be used to fill white, gray and black colors inside the selected layer, but mainly these three options are used when you work on layer masks instead of layers. Layer mask is basically a way to control layer’s transparency. There are three types of layer masks you can use in Photoshop. These are White, Black and Gray.  If you fill white color inside the selected layer mask, that will make the layer beside it completely visible with 0% transparency, if you fill black color inside the selected layer mask, that will make the layer beside it completely invisible with 100% transparency and if you fill 50% gray inside the selected layer mask that will make the layer beside it 50% transparent. In order to understand how to control transparency of any layer by filling white, black and gray colors inside the layer mask beside it, follow the instructions given below.

First of all fill any pattern inside the background layer by selecting it form the  pattern picker menu named Custom Pattern  that is given in the dialogue box named Fill, as I have explained earlier. Then add a new layer by hitting the small icon that can be seen right beneath the layer palette and referred as Create a new layer. As soon as you will click that icon, there will be appeared a new thumbnail, right above the background layer in the layer palette, representing a new transparent layer according to the picture below.

New-transparent-layer-right-above-the-background-layer
New layer thumbnail right above the thumbnail representing background layer in the layer palette

Then. fill any solid color (either background or foreground) in that newly added transparent layer using Fill dialogue box as I have explained earlier. As soon as the solid color will be filled inside the newly added layer, it will  no longer remain transparent and hide completely the background layer according to the picture below.

no-pattern-visible
As layer 1 is no longer transparent so it has hidden background layer completely

Then, add a layer mask beside that layer by clicking the small icon that can be seen right beneath the layer palette and says Add layer mask every time having been hovered over. As soon as you will click that icon, a new thumbnail will be appeared right beside the selected layer representing newly added layer mask according the picture below.

White-layer-mask
Layer 1 is totally visible with white layer mask beside and it has hidden background layer
As each layer mask carries white fill inside it by default and white fill inside any layer mask represents 0% transparency of the layer beside the same layer mask so the addition of a layer mask will cause no change in the appearance of the document.

If you fill black color inside the layer mask, by selecting the option black given inside the drop-down menu named Use, the layer beside the same layer mask will become perfectly invisible with 100% transparency and the background layer will become perfectly visible according to the picture below.

black-layer-mask
Background layer is totally visible from behind the 100% transparent layer 1

If you fill 50%  grey inside the layer mask instead of black or white , the layer beside the layer mask will become 50% transparent and the background layer will begin to peer from behind according to the picture below.

gray-layer-mask
Background layer is peering from behind the 50% transparent layer 1

Blending

The second pan in the dialogue box named Fill is referred as Blending. In this pan there can be seen a drop-down menu named Mode. Though the  default Mode you always find selected here is none other than Normal, but you can select any blending mode of your choice out of the different options given inside that drop down menu to apply on the selected fill style. Further, in the same pan there will be seen another box referred as Opacity. In that box you can specify the required opacity for the selected fill style in percentage by typing the value manually in the box.
 For instance if you specify Foreground Color as Content, Difference as Mode and Opacity equal to 60% in the dialogue box named Fill according to the picture below.

Foreground-Color-as-Content-dissolve-as-mode
Specify Content, Mode and Opacity for the layer

The outcome of that setting can be seen in the picture below.

impacts-of-sixty-percent-opacity-and-the-blending-mode-name-Dissolve
Background layer with  blending mode named Dissolve applied along with Foreground Color

Right beneath the box named Opacity, there will be seen a check box named Preserve Transparency. Check is supposed to be put inside that check box only when we want to preserve the transparency of the empty area inside the selected layer. For instance in the following image you can see a square shaped object made on the otherwise transparent layer 1.

yellow-square-on-the-otherwise-transparent-layer
White background layer is peering through  the transparent pixels of  layer 1

In order to fill any pattern inside that square shaped object only and to keep rest of the layer completely transparent, all you need to do is to put check inside the check box referred as Preserve Transparency along with selecting any required pattern out of the different options given inside the pattern picker named Custom Pattern according to the picture below.
Preserve-transparency-check-box-is-selected
In order to keep intact the transparent part of the layer  put check inside the check box named Preserve Transparency

Having done that setting, click the button named OK to apply it on the selected layer and you will see the outcome similar to the picture below.

Transparent-part-of-the-layer-has-been-preserved
Still partly transparent layer 1
If you want to fill the required pattern inside the entire layer, check is not supposed to be put inside the check box named Preserve Transparency according to the picture below.

no-check-inside-preserve-transparency-check-box
Preserve Transparency check box is no longer selected
 As the check box named Preserved Transparency has not been selected, so, as soon as you will hit the button named OK, the selected pattern will be filled inside the entire layer according to the picture below.

all-pixels-are-colord
Transparency has not been preserved of the formerly transparent pixels
So that is all about the dialogue box named Fill. I hope this post will be proved helpful to all my readers.Kindly don't forget to share your opinion regarding this post by subscribing your comments


Diberdayakan oleh Blogger.